LMDeploy 大模型量化部署实践
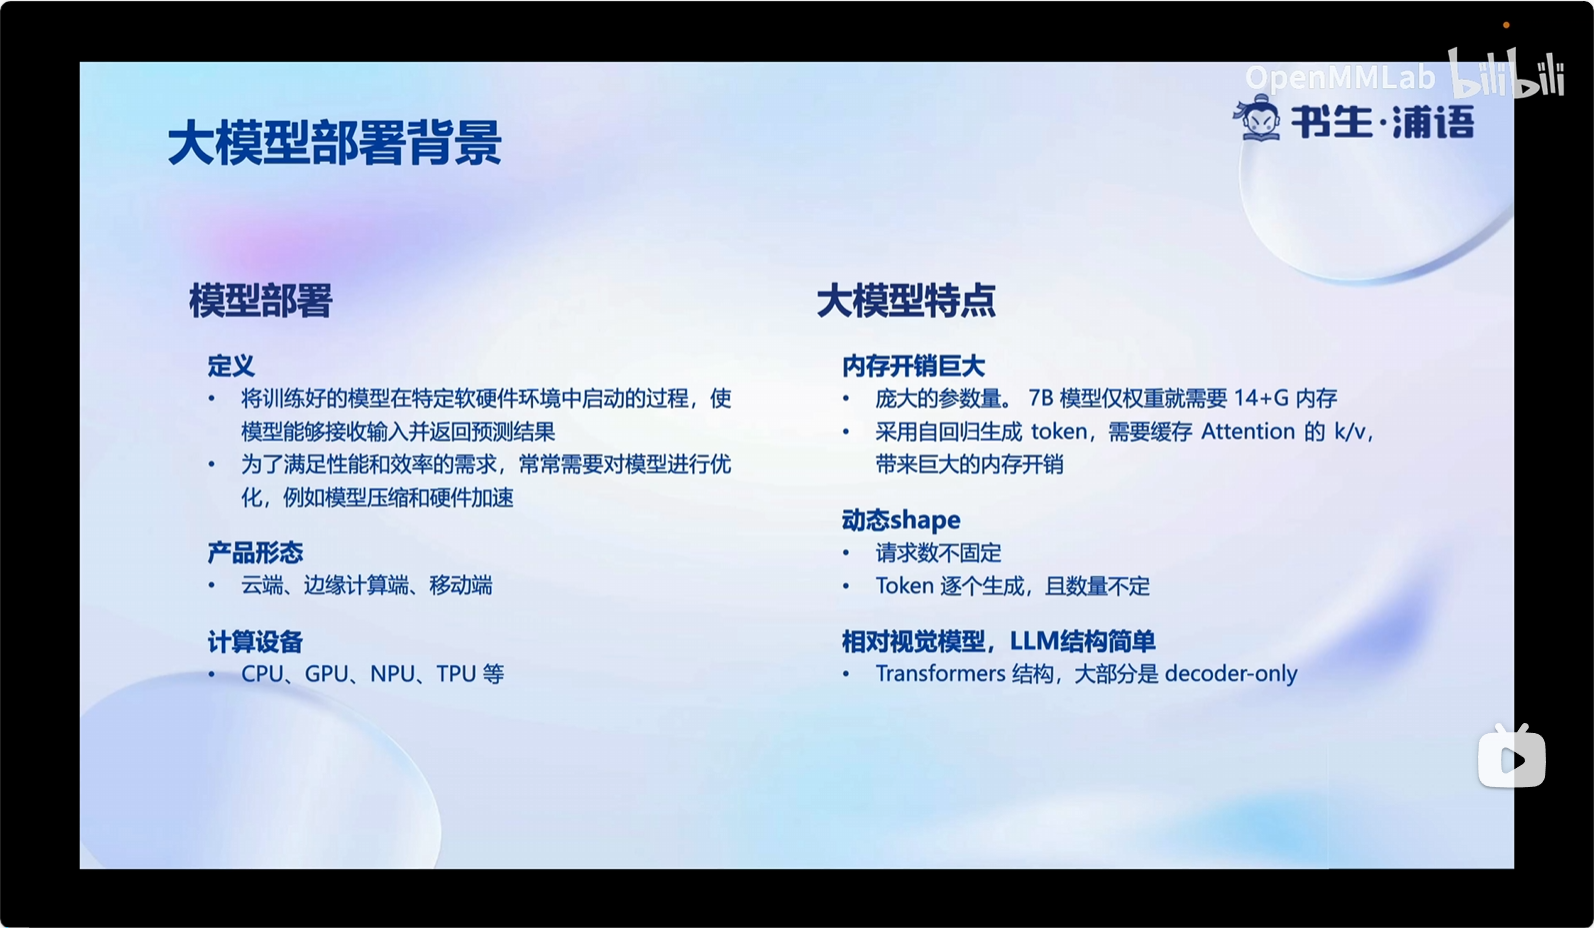
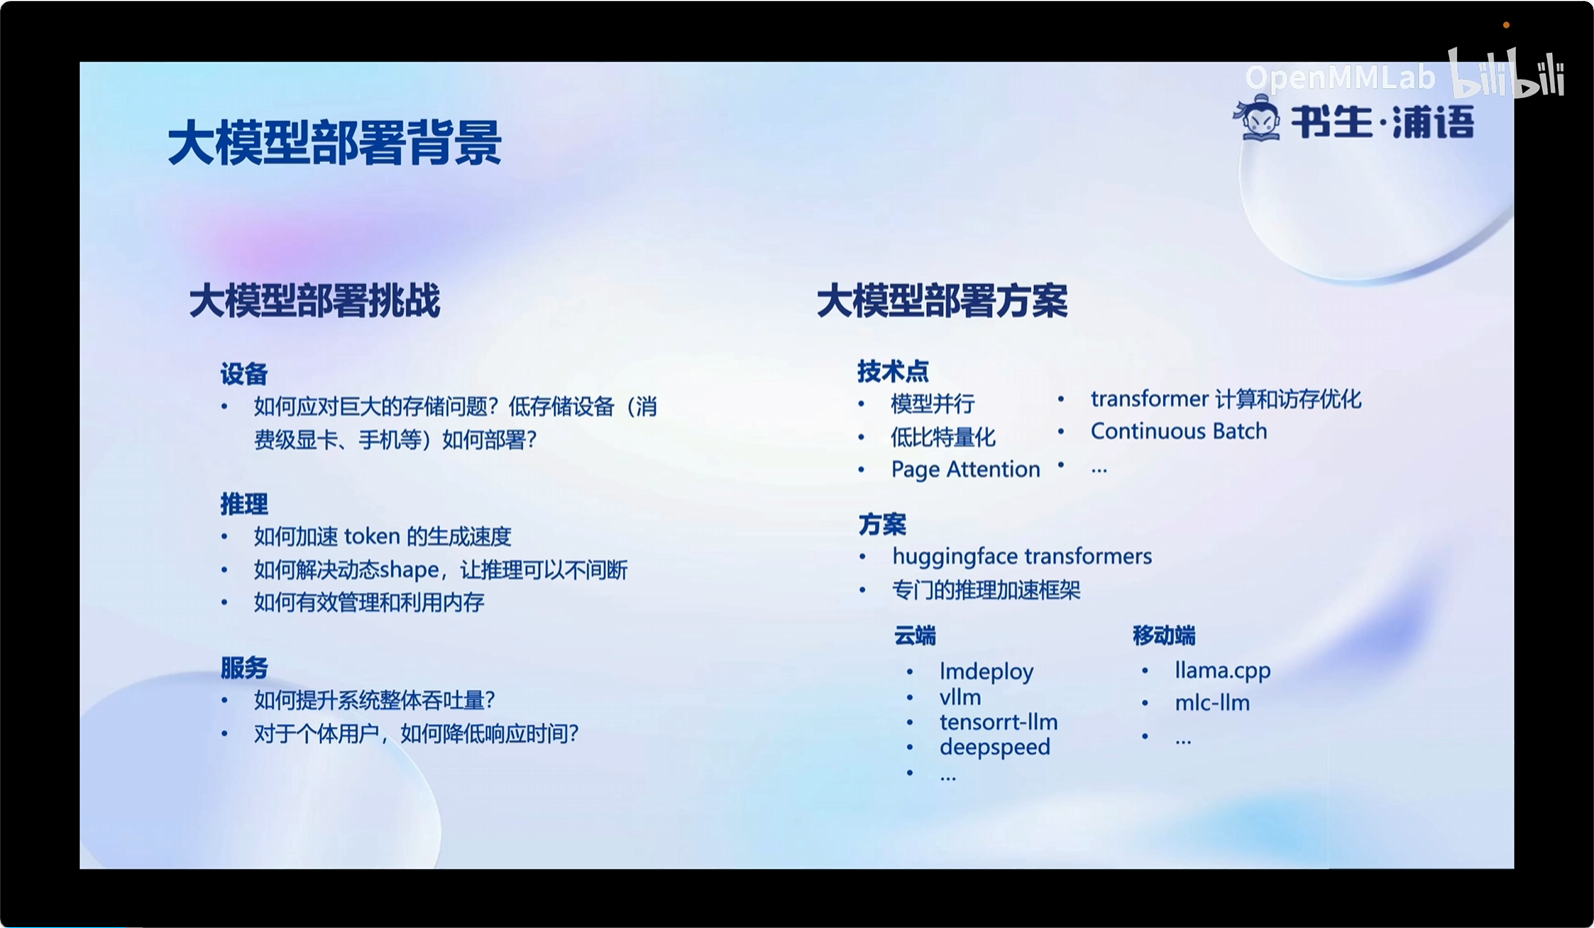
1.背景
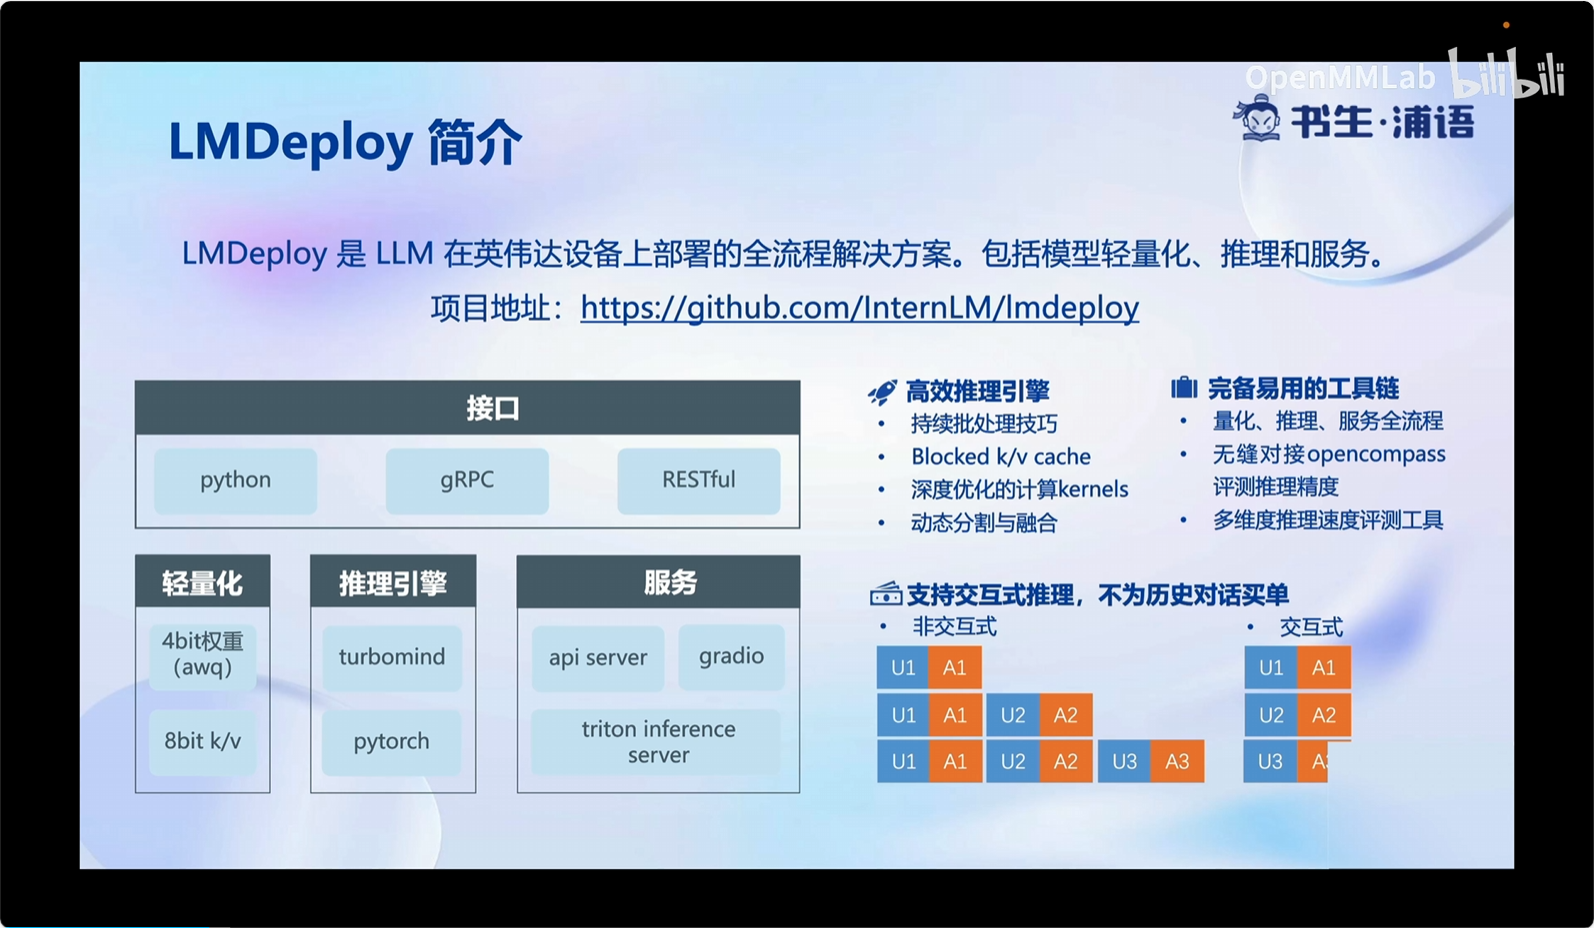
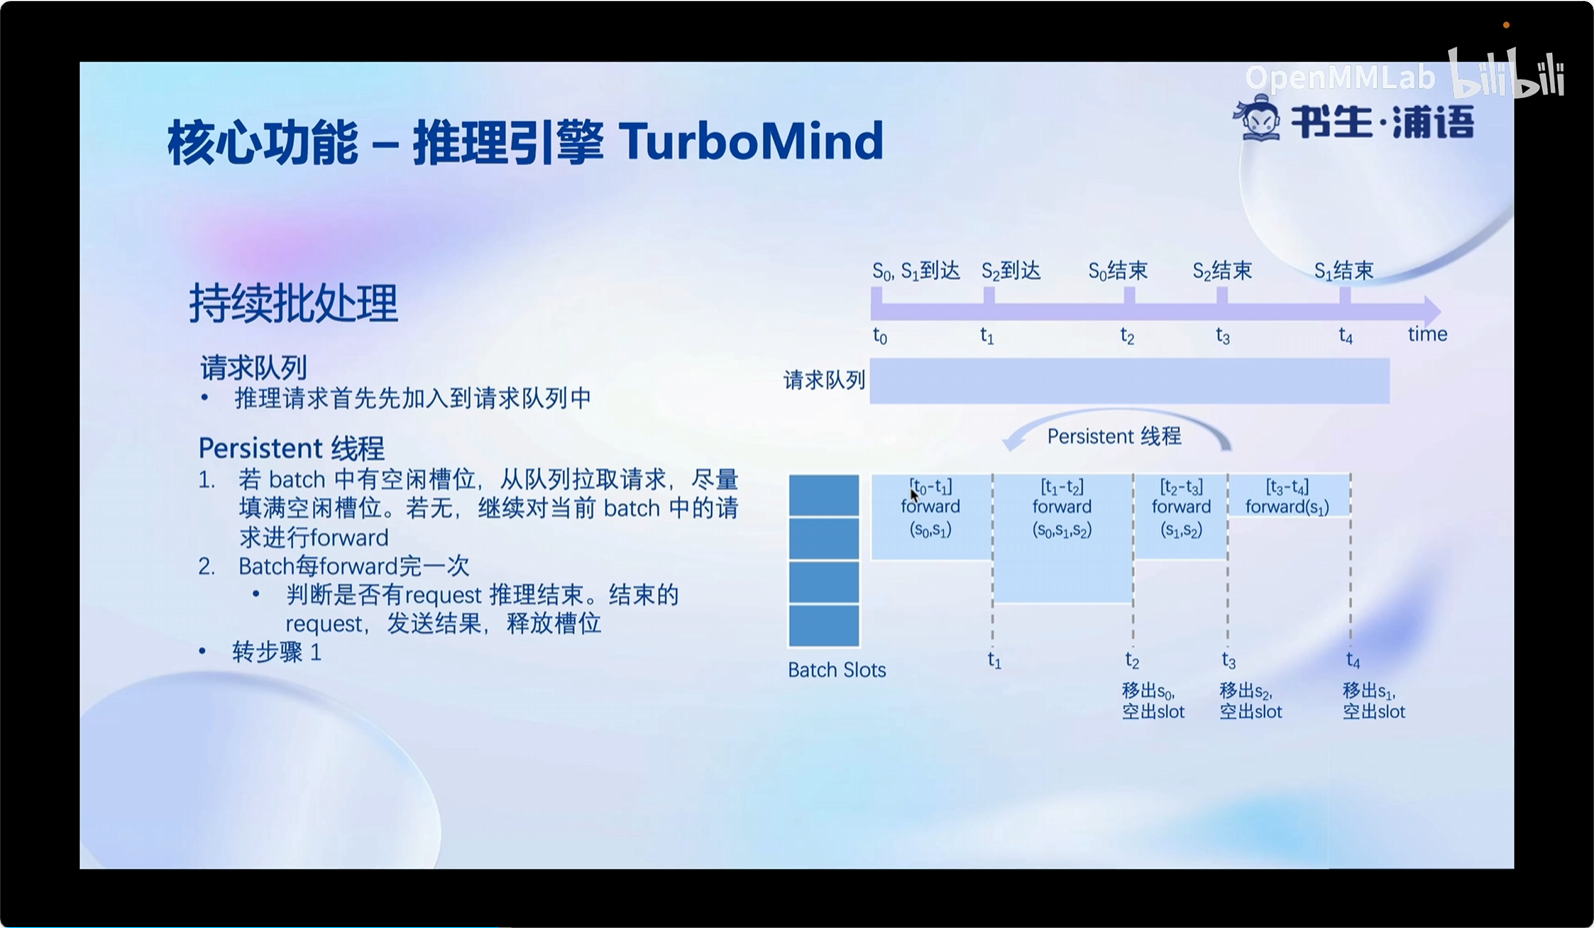
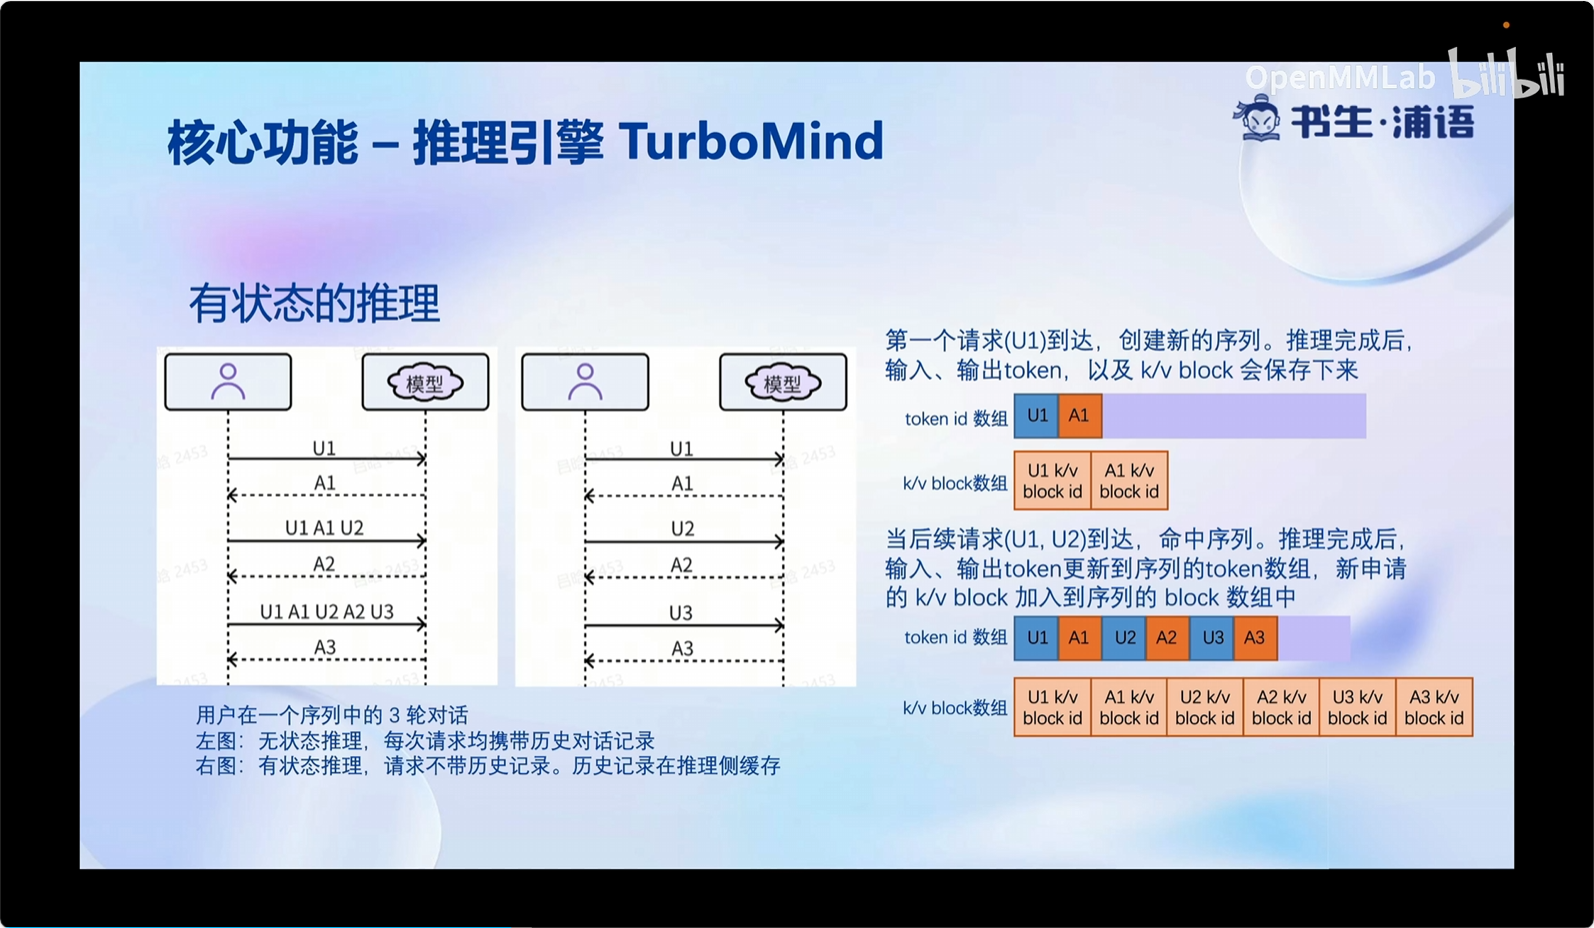
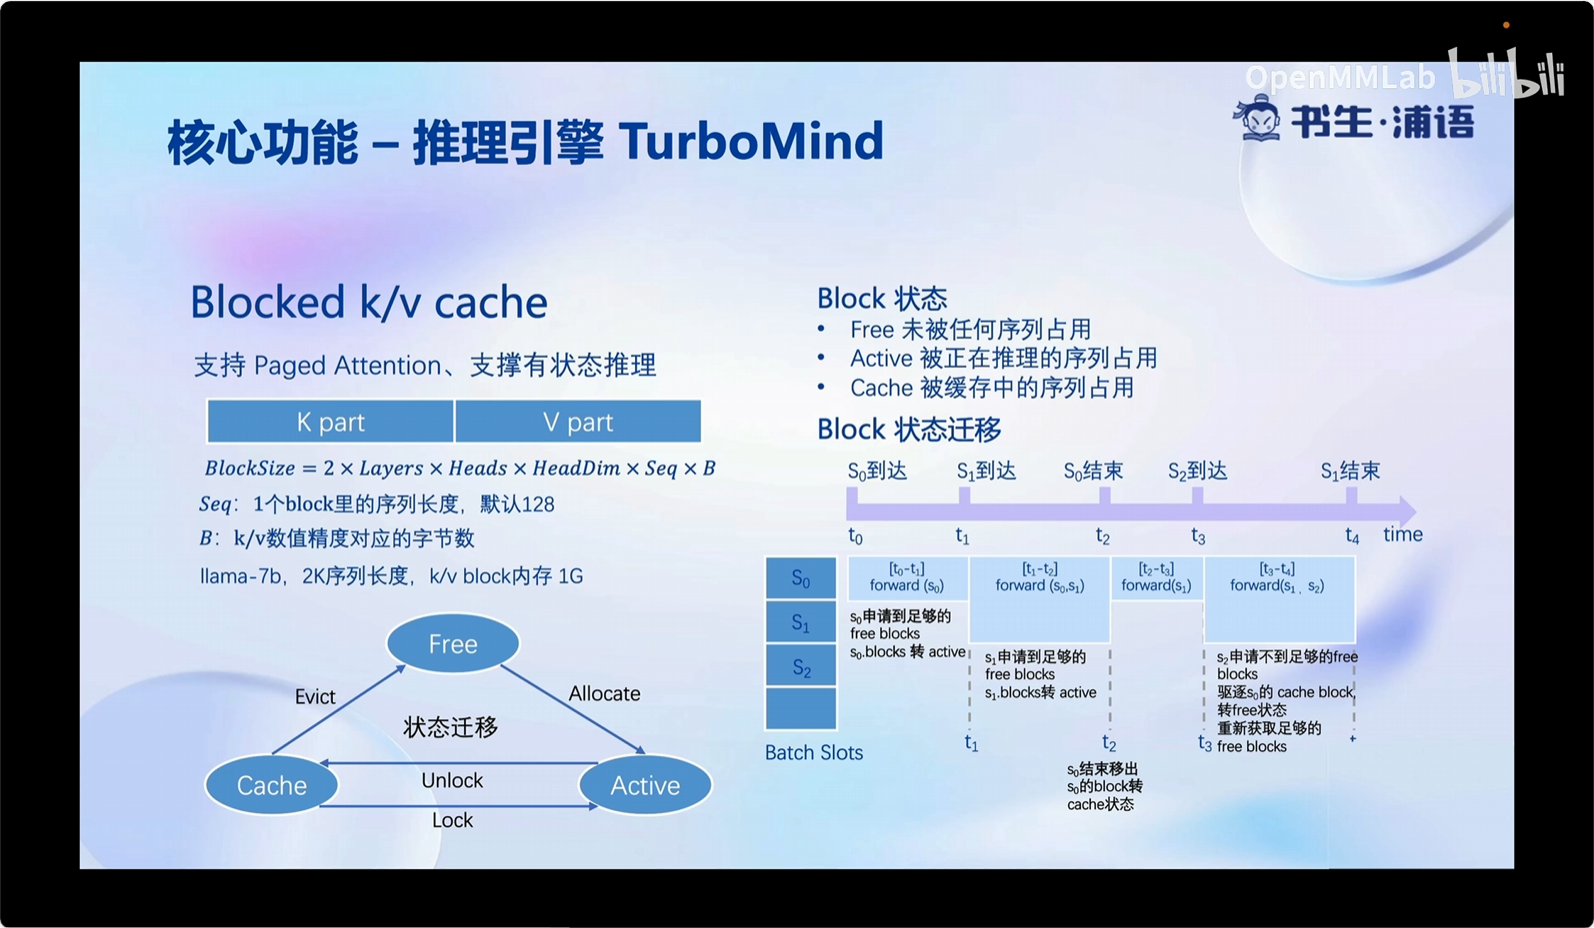
2.LMDeploy介绍
3.实践
3.1 环境配置
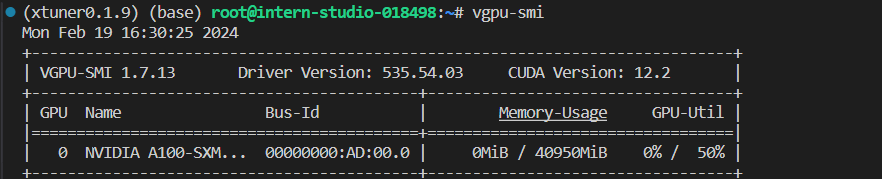
首先我们可以使用 vgpu-smi 查看显卡资源使用情况。
lmdeploy 没有安装,我们接下来手动安装一下,建议安装最新的稳定版。 如果是在 InternStudio 开发环境,需要先运行下面的命令,否则会报错。
# 解决 ModuleNotFoundError: No module named 'packaging' 问题
pip install packaging
# 使用 flash_attn 的预编译包解决安装过慢问题
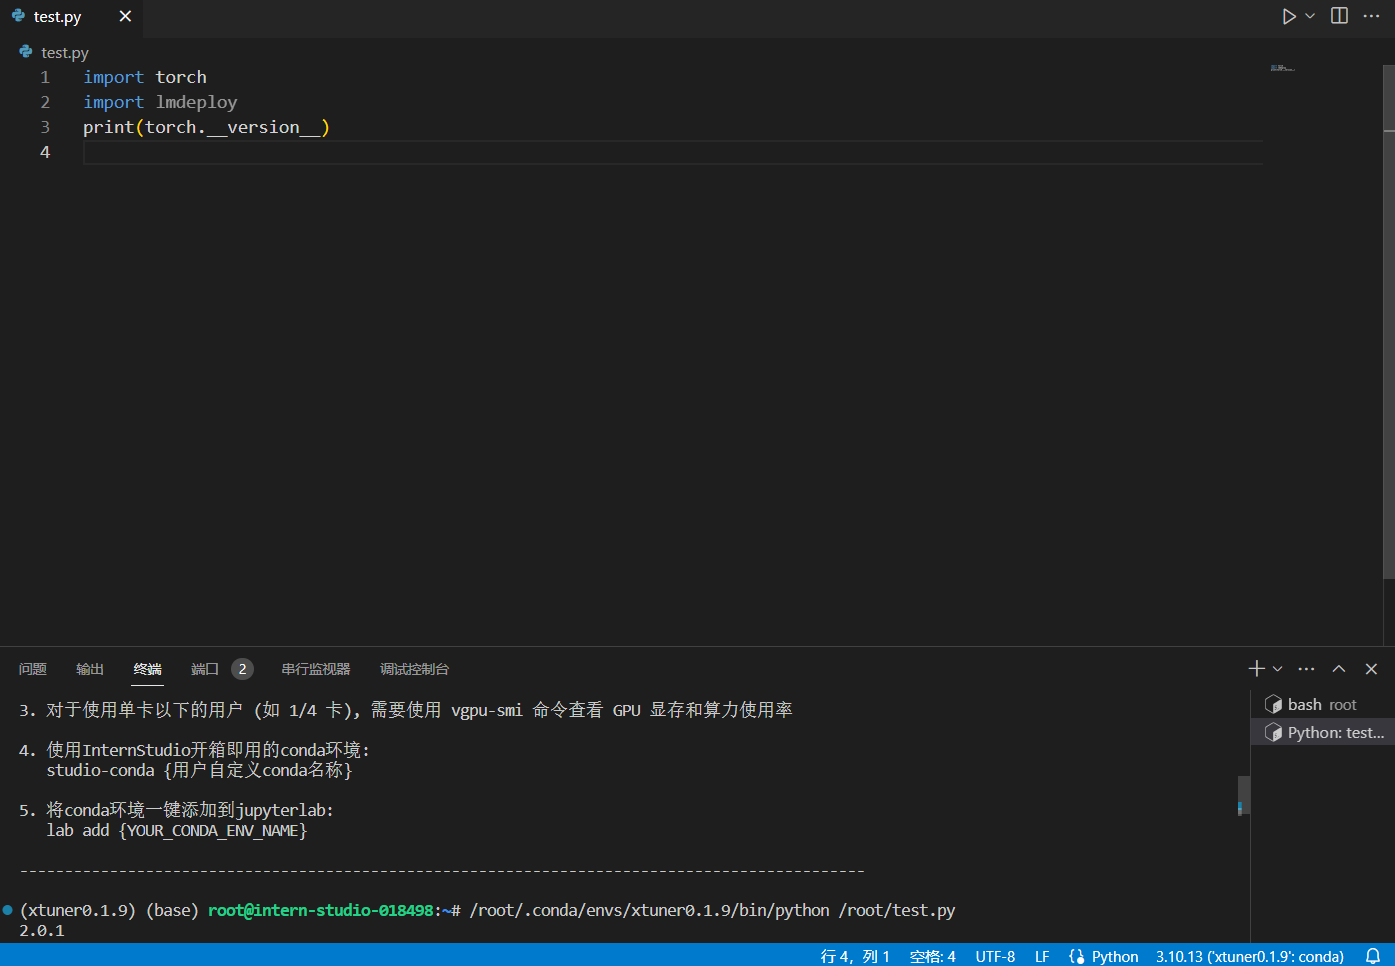
pip install /root/share/wheels/flash_attn-2.4.2+cu118torch2.0cxx11abiTRUE-cp310-cp310-linux_x86_64.whlpip install 'lmdeploy[all]==v0.1.0'由于默认安装的是 runtime 依赖包,但是我们这里还需要部署和量化,所以,这里选择 [all]。然后可以再检查一下 lmdeploy 包,如下图所示。
3.2 服务部署
3.2.1 模型转换
3.2.1.1 在线转换
lmdeploy 支持直接读取 Huggingface 模型权重,目前共支持三种类型:
- 在 huggingface.co 上面通过 lmdeploy 量化的模型,如 llama2-70b-4bit, internlm-chat-20b-4bit
- huggingface.co 上面其他 LM 模型,如 Qwen/Qwen-7B-Chat
示例如下:
# 需要能访问 Huggingface 的网络环境
lmdeploy chat turbomind internlm/internlm-chat-20b-4bit --model-name internlm-chat-20b
lmdeploy chat turbomind Qwen/Qwen-7B-Chat --model-name qwen-7b
上面两行命令分别展示了如何直接加载 Huggingface 的模型,第一条命令是加载使用 lmdeploy 量化的版本,第二条命令是加载其他 LLM 模型。
我们也可以直接启动本地的 Huggingface 模型,如下所示。
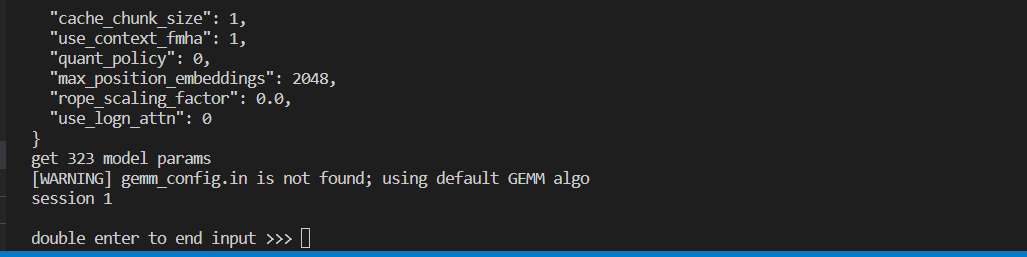
lmdeploy chat turbomind /share/temp/model_repos/internlm-chat-7b/ --model-name internlm-chat-7b以上命令都会启动一个本地对话界面,通过 Bash 可以与 LLM 进行对话。
3.2.1.2 离线转换
离线转换需要在启动服务之前,将模型转为 lmdeploy TurboMind 的格式,如下所示。
# 转换模型(FastTransformer格式) TurboMind
lmdeploy convert internlm-chat-7b /path/to/internlm-chat-7b
这里我们使用官方提供的模型文件,就在用户根目录执行,如下所示。
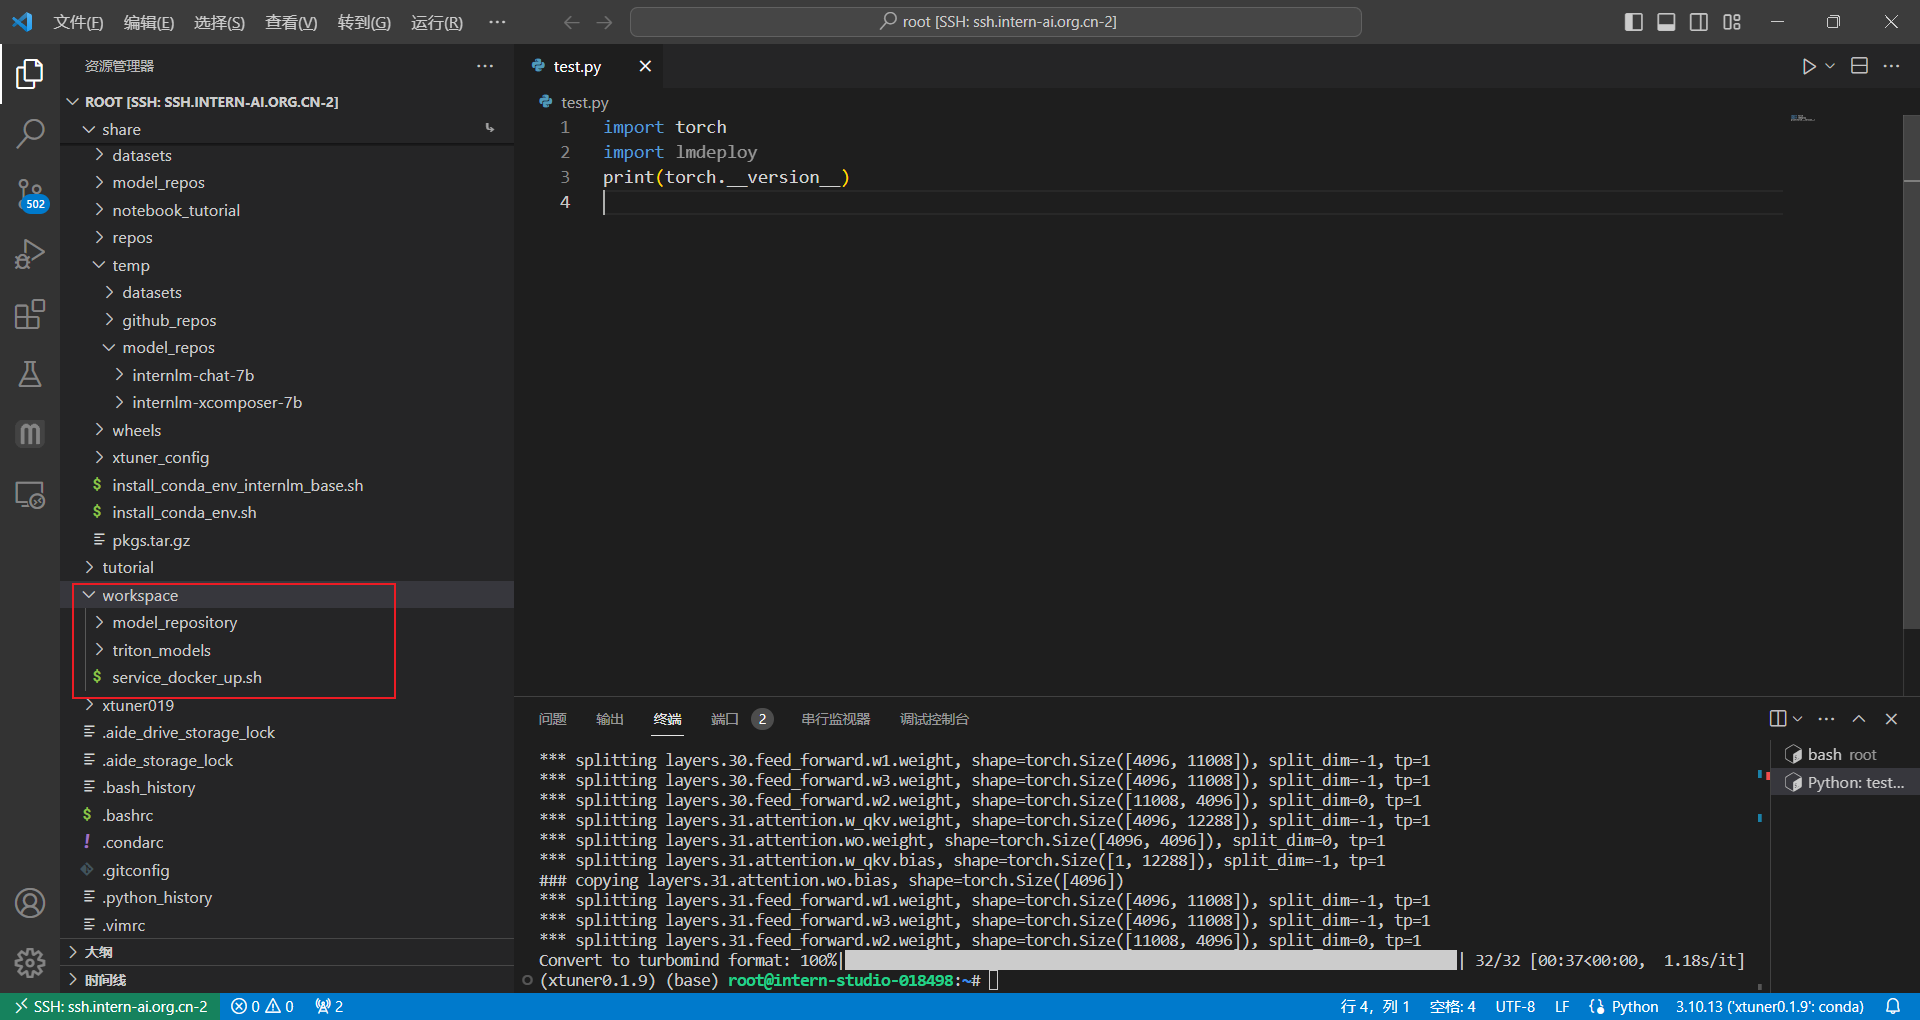
lmdeploy convert internlm-chat-7b /root/share/temp/model_repos/internlm-chat-7b/执行完成后将会在当前目录生成一个 workspace 的文件夹。这里面包含的就是 TurboMind 和 Triton “模型推理”需要到的文件。
目录如下图所示。
3.2.2 TurboMind 推理+命令行本地对话
模型转换完成后,我们就具备了使用模型推理的条件,接下来就可以进行真正的模型推理环节。
我们先尝试本地对话(Bash Local Chat),下面用(Local Chat 表示)在这里其实是跳过 API Server 直接调用 TurboMind。简单来说,就是命令行代码直接执行 TurboMind。所以说,实际和前面的架构图是有区别的。
这里支持多种方式运行,比如Turbomind、PyTorch、DeepSpeed。但 PyTorch 和 DeepSpeed 调用的其实都是 Huggingface 的 Transformers 包,PyTorch表示原生的 Transformer 包,DeepSpeed 表示使用了 DeepSpeed 作为推理框架。Pytorch/DeepSpeed 目前功能都比较弱,不具备生产能力,不推荐使用。
执行命令如下。
# Turbomind + Bash Local Chat
lmdeploy chat turbomind ./workspace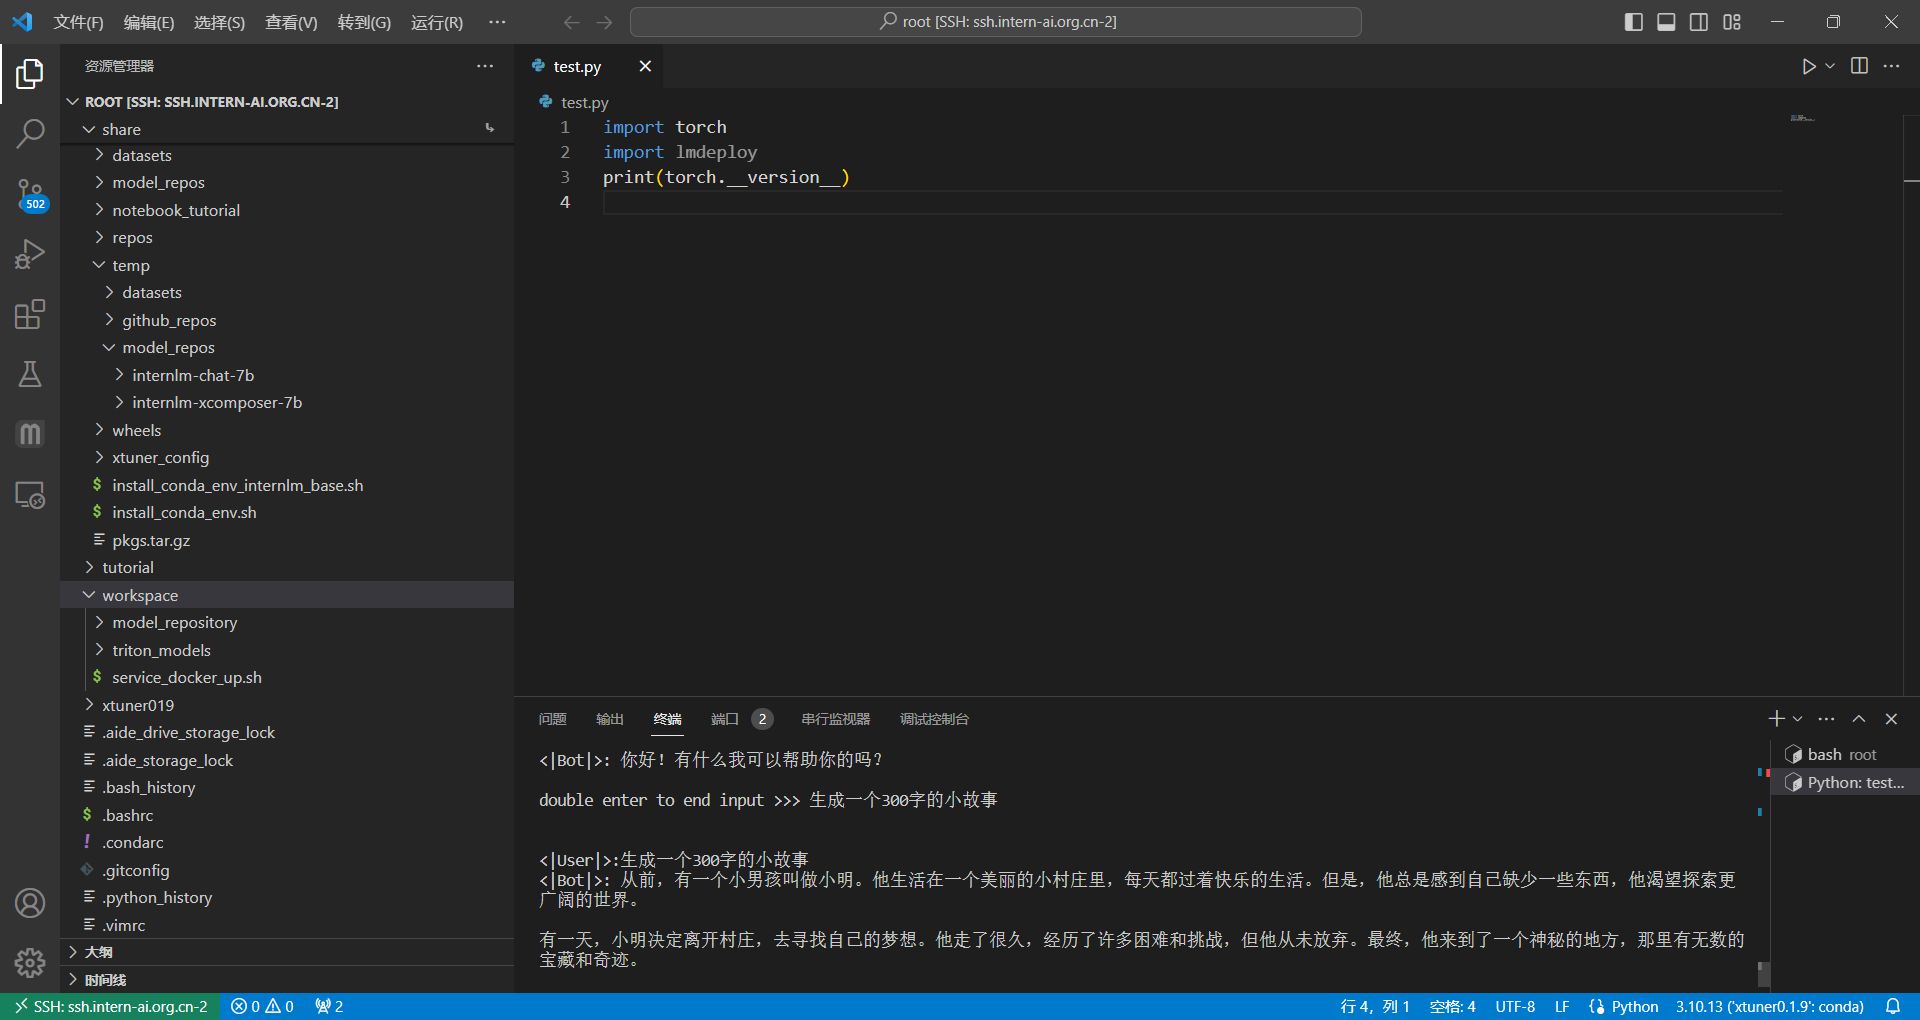
3.2.3 TurboMind推理+API服务
在上面的部分我们尝试了直接用命令行启动 Client,接下来我们尝试如何运用 lmdepoy 进行服务化。
”模型推理/服务“目前提供了 Turbomind 和 TritonServer 两种服务化方式。此时,Server 是 TurboMind 或 TritonServer,API Server 可以提供对外的 API 服务。我们推荐使用 TurboMind,TritonServer 使用方式详见《附录1》。
首先,通过下面命令启动服务。
# ApiServer+Turbomind api_server => AsyncEngine => TurboMind
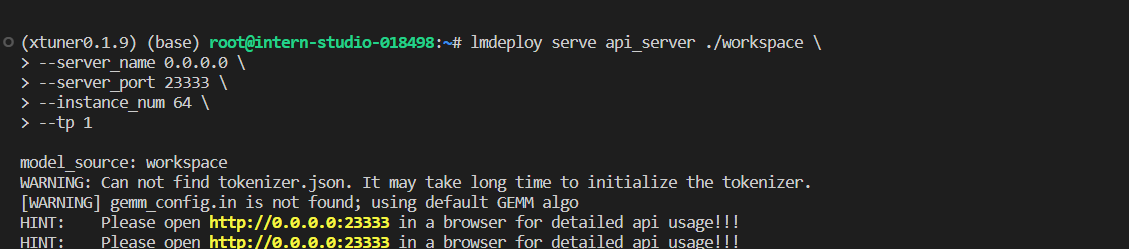
lmdeploy serve api_server ./workspace \
--server_name 0.0.0.0 \
--server_port 23333 \
--instance_num 64 \
--tp 1上面的参数中 server_name 和 server_port 分别表示服务地址和端口,tp 参数我们之前已经提到过了,表示 Tensor 并行。还剩下一个 instance_num 参数,表示实例数,可以理解成 Batch 的大小。执行后如下图所示。
然后,我们可以新开一个窗口,执行下面的 Client 命令。如果使用官方机器,可以打开 vscode 的 Terminal,执行下面的命令。
# ChatApiClient+ApiServer(注意是http协议,需要加http)
lmdeploy serve api_client http://localhost:23333
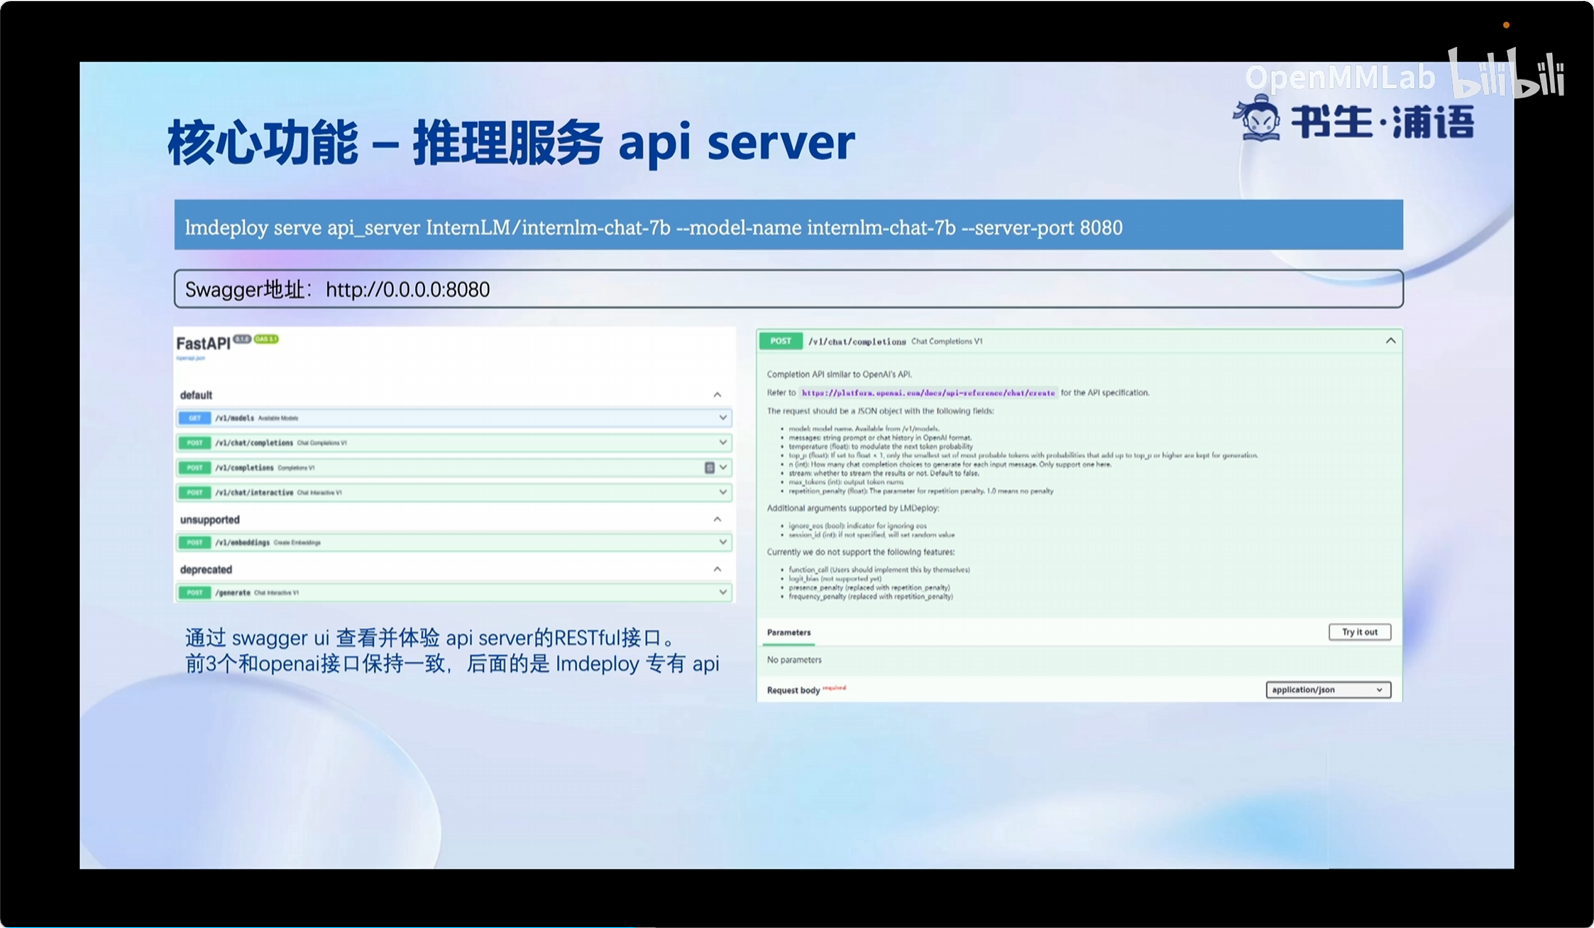
当然,刚刚我们启动的是 API Server,自然也有相应的接口。可以直接打开 http://localhost:23333/ 查看,如下图所示。
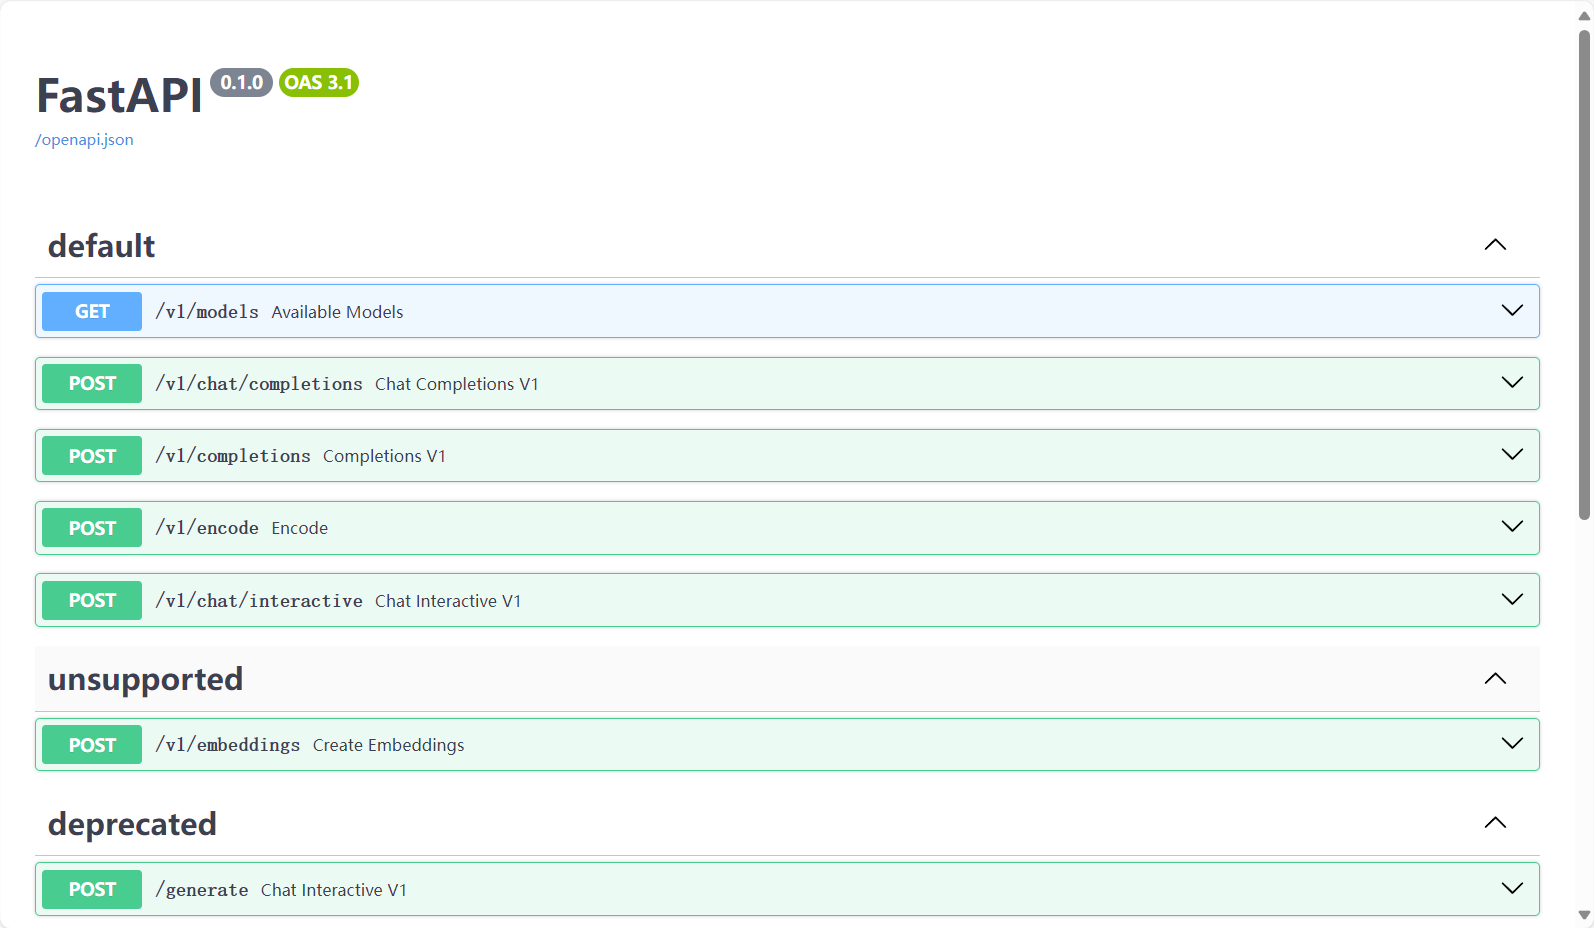
这里一共提供了 4 个 HTTP 的接口,任何语言都可以对其进行调用,我们以 v1/chat/completions 接口为例,简单试一下。
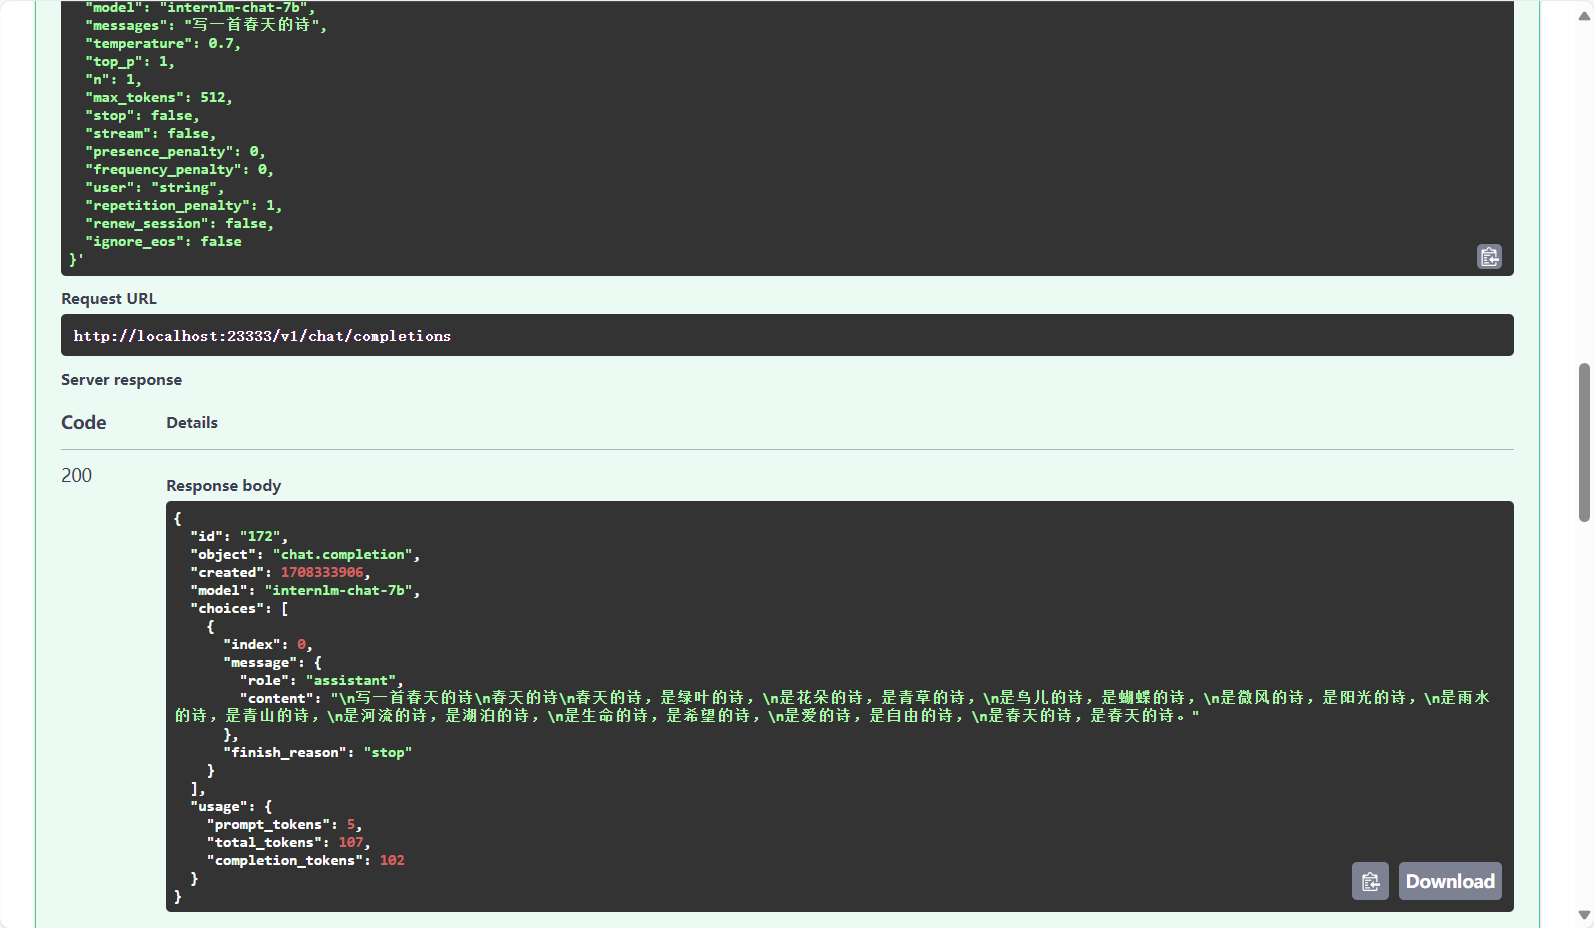
接口请求参数如下:
{
  "model": "internlm-chat-7b",
  "messages": "写一首春天的诗",
  "temperature": 0.7,
  "top_p": 1,
  "n": 1,
  "max_tokens": 512,
  "stop": false,
  "stream": false,
  "presence_penalty": 0,
  "frequency_penalty": 0,
  "user": "string",
  "repetition_penalty": 1,
  "renew_session": false,
  "ignore_eos": false
}
3.2.4 网页 Demo 演示
这一部分主要是将 Gradio 作为前端 Demo 演示。在上一节的基础上,我们不执行后面的 api_client 或 triton_client,而是执行 gradio。
由于 Gradio 需要本地访问展示界面,因此也需要通过 ssh 将数据转发到本地。命令如下:
ssh -CNg -L 6006:127.0.0.1:6006 [email protected] -p <你的 ssh 端口号>
3.2.4.1 TurboMind 服务作为后端
需要启动API Server ,启动方式和上一节一样
这里直接启动作为前端的 Gradio。
# Gradio+ApiServer。必须先开启 Server,此时 Gradio 为 Client
lmdeploy serve gradio http://0.0.0.0:23333 \
    --server_name 0.0.0.0 \
    --server_port 6006 \
    --restful_api True
3.2.4.2 TurboMind 推理作为后端
当然,Gradio 也可以直接和 TurboMind 连接,如下所示。
# Gradio+Turbomind(local)
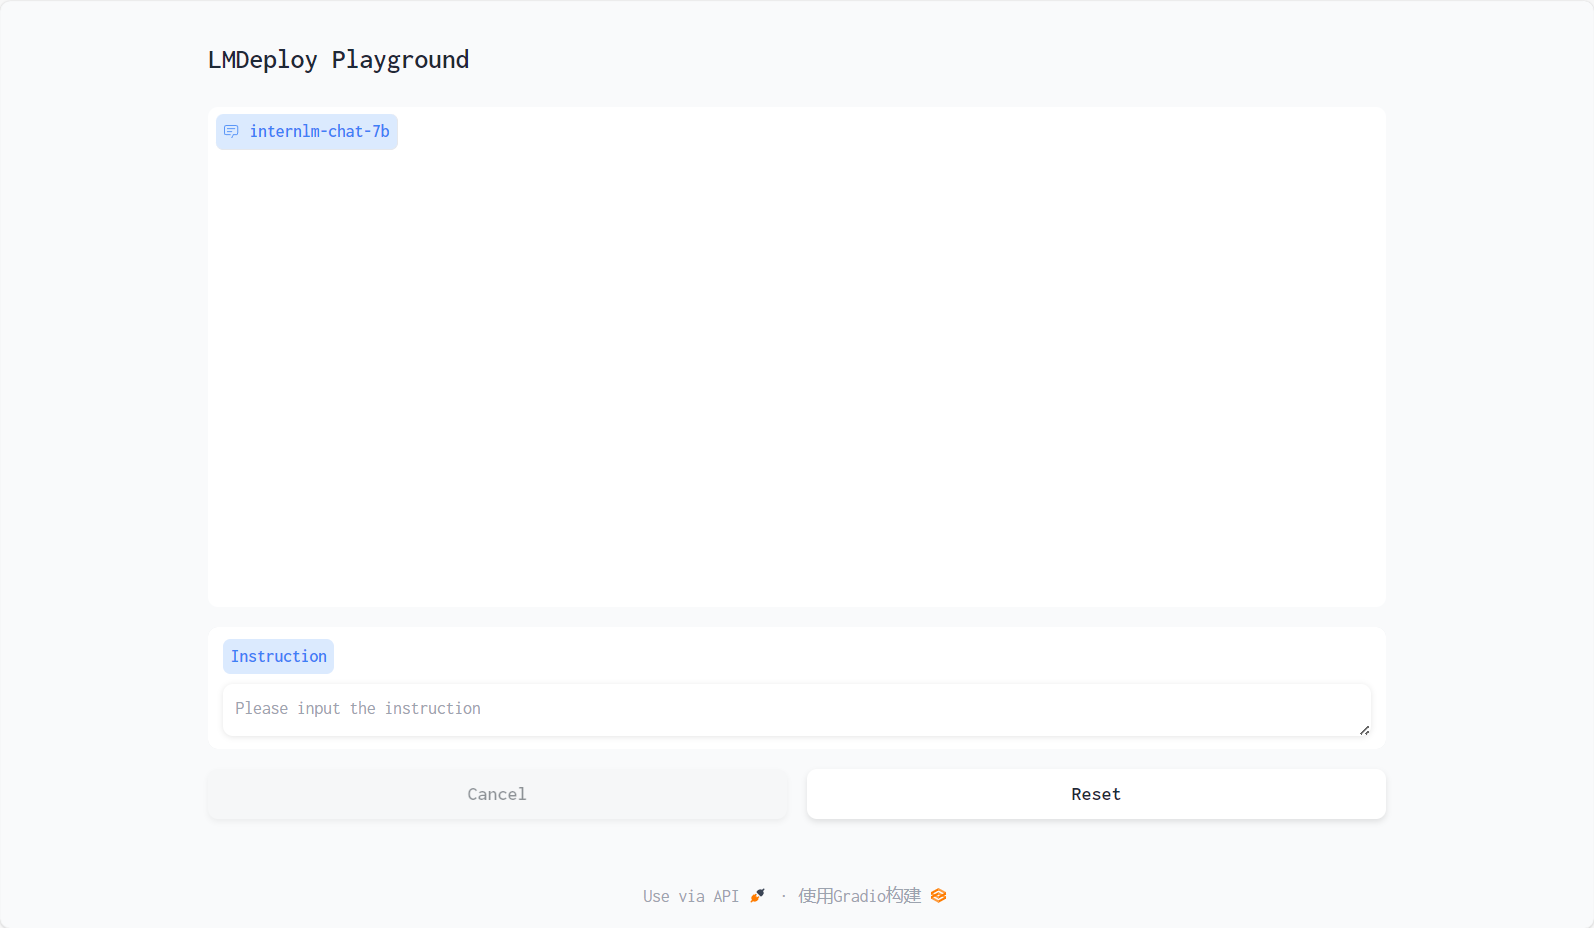
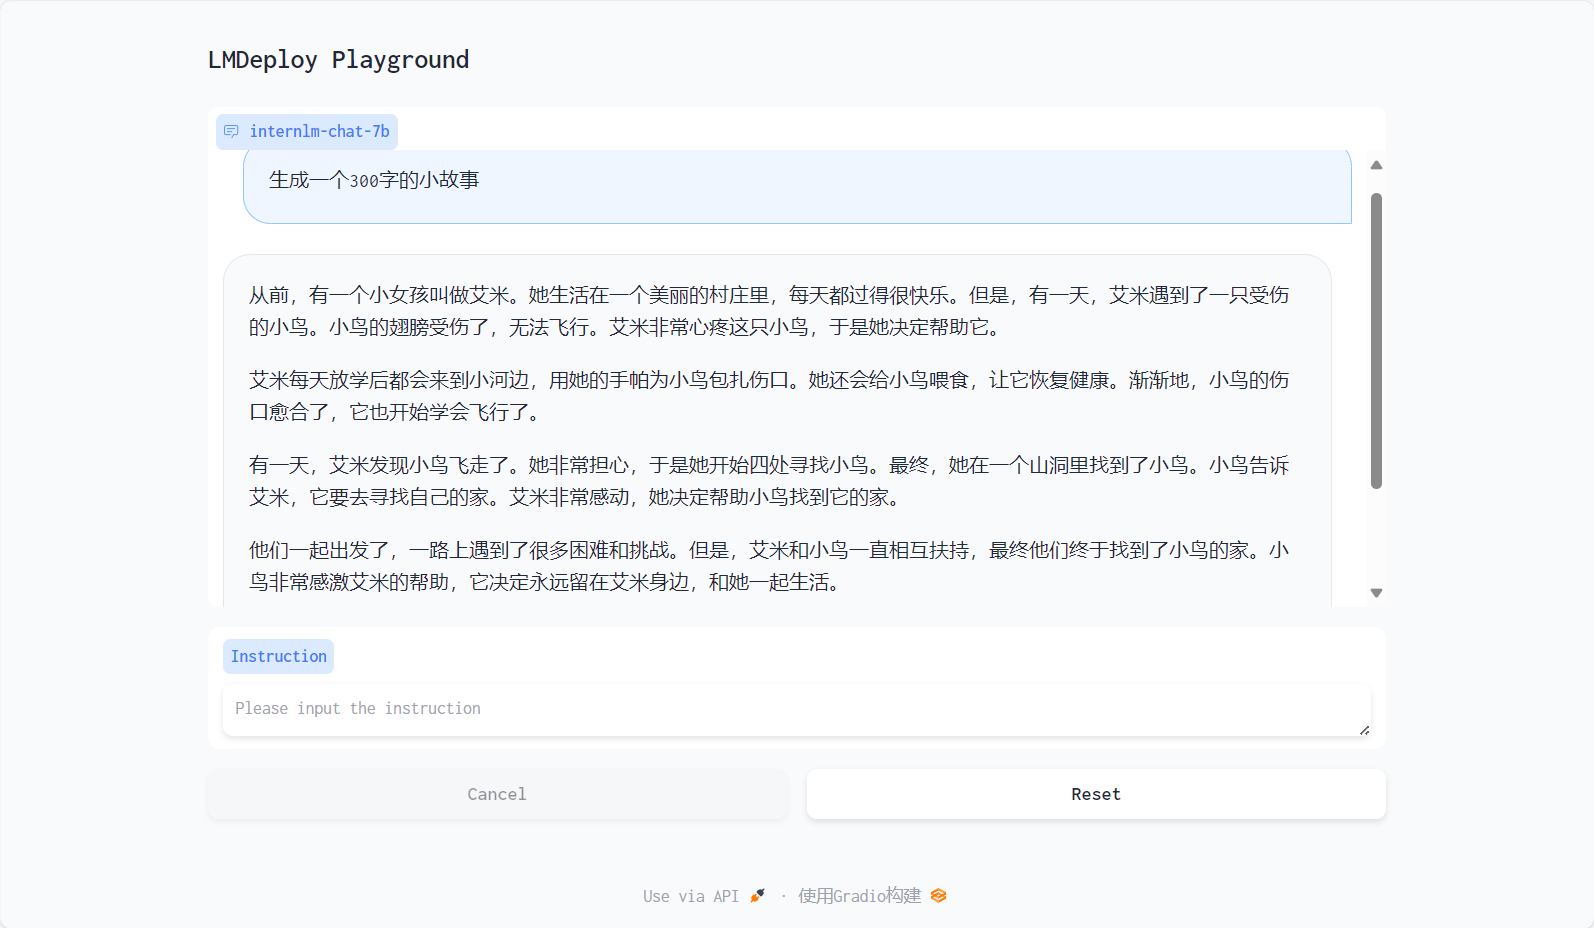
lmdeploy serve gradio ./workspace可以直接启动 Gradio,此时没有 API Server,TurboMind 直接与 Gradio 通信。如下图所示。
3.2.5 TurboMind 推理 + Python 代码集成
前面介绍的都是通过 API 或某种前端与”模型推理/服务“进行交互,lmdeploy 还支持 Python 直接与 TurboMind 进行交互,如下所示。
from lmdeploy import turbomind as tm

# load model
model_path = "/root/share/temp/model_repos/internlm-chat-7b/"
tm_model = tm.TurboMind.from_pretrained(model_path, model_name='internlm-chat-20b')
generator = tm_model.create_instance()

# process query
query = "你好啊兄嘚"
prompt = tm_model.model.get_prompt(query)
input_ids = tm_model.tokenizer.encode(prompt)

# inference
for outputs in generator.stream_infer(
        session_id=0,
        input_ids=[input_ids]):
    res, tokens = outputs[0]

response = tm_model.tokenizer.decode(res.tolist())
print(response)
在上面的代码中,我们首先加载模型,然后构造输入,最后执行推理。
加载模型可以显式指定模型路径,也可以直接指定 Huggingface 的 repo_id,还可以使用上面生成过的 workspace。这里的 tm.TurboMind 其实是对 C++ TurboMind 的封装。
构造输入这里主要是把用户的 query 构造成 InternLLM 支持的输入格式,比如上面的例子中, query 是“你好啊兄嘚”,构造好的 Prompt 如下所示。
"""
<|System|>:You are an AI assistant whose name is InternLM (书生·浦语).
- InternLM (书生·浦语) is a conversational language model that is developed by Shanghai AI Laboratory (上海人工智能实验室). It is designed to be helpful, honest, and harmless.
- InternLM (书生·浦语) can understand and communicate fluently in the language chosen by the user such as English and 中文.

<|User|>:你好啊兄嘚
<|Bot|>:
"""
Prompt 其实就是增加了 <|System|> 消息和 <|User|> 消息(即用户的 query),以及一个 <|Bot|> 的标记,表示接下来该模型输出响应了。最终输出的响应内容如下所示。
"你好啊,有什么我可以帮助你的吗?"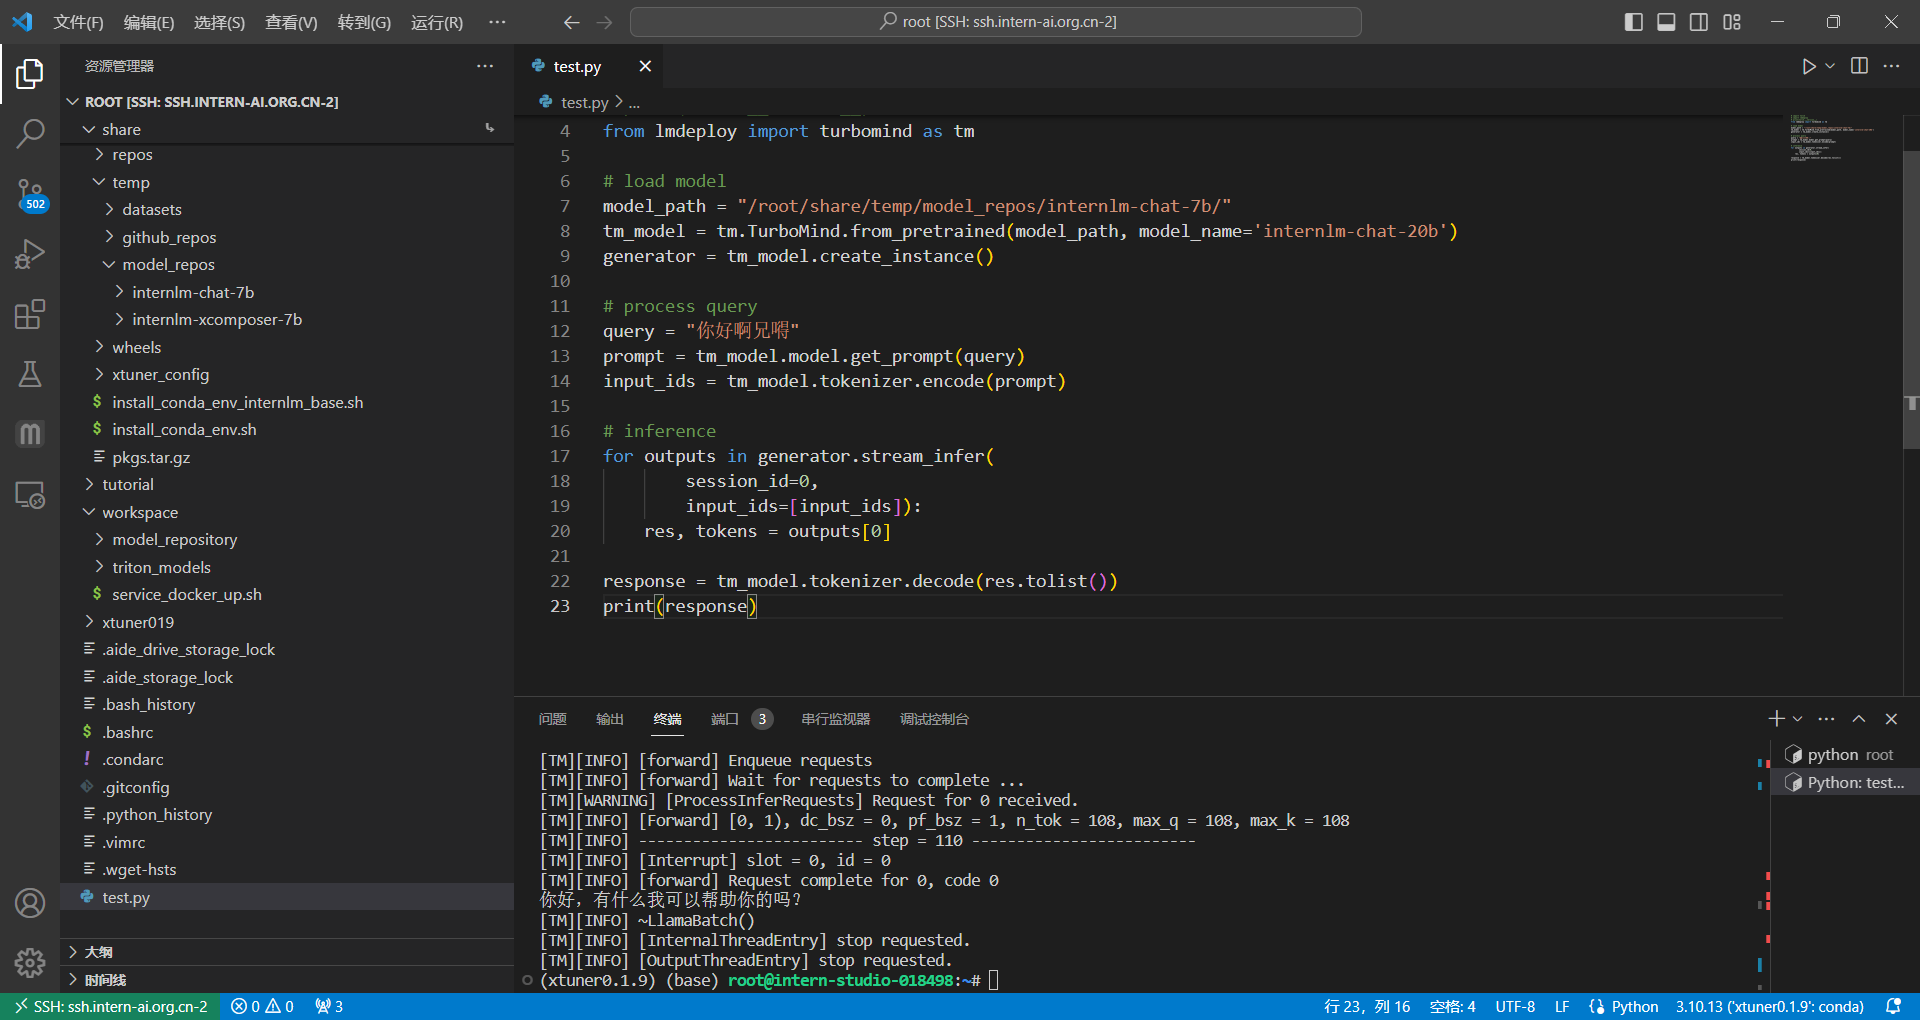
Comments NOTHING