1. 概述
1.1 Lagent 是什么
Lagent 是一个轻量级开源智能体框架,旨在让用户可以高效地构建基于大语言模型的智能体。同时它也提供了一些典型工具以增强大语言模型的能力。
Lagent 目前已经支持了包括 AutoGPT、ReAct 等在内的多个经典智能体范式,也支持了如下工具:
- Arxiv 搜索
- Bing 地图
- Google 学术搜索
- Google 搜索
- 交互式 IPython 解释器
- IPython 解释器
- PPT
- Python 解释器
1.2 AgentLego 是什么
AgentLego 是一个提供了多种开源工具 API 的多模态工具包,旨在像是乐高积木一样,让用户可以快速简便地拓展自定义工具,从而组装出自己的智能体。通过 AgentLego 算法库,不仅可以直接使用多种工具,也可以利用这些工具,在相关智能体框架(如 Lagent,Transformers Agent 等)的帮助下,快速构建可以增强大语言模型能力的智能体。
AgentLego 目前提供了如下工具:
| 通用能力 | 语音相关 | 图像处理 | AIGC |
|---|---|---|---|
| 计算器谷歌搜索 | 文本 -> 音频(TTS)音频 -> 文本(STT) | 描述输入图像识别文本(OCR)视觉问答(VQA)人体姿态估计人脸关键点检测图像边缘提取(Canny)深度图生成生成涂鸦(Scribble)检测全部目标检测给定目标SAM分割一切分割给定目标 | 文生图图像拓展删除给定对象替换给定对象根据指令修改ControlNet 系列根据边缘+描述生成根据深度图+描述生成根据姿态+描述生成根据涂鸦+描述生成ImageBind 系列音频生成图像热成像生成图像音频+图像生成图像音频+文本生成图像 |
1.3 两者的关系
经过上面的介绍,我们可以发现,Lagent 是一个智能体框架,而 AgentLego 与大模型智能体并不直接相关,而是作为工具包,在相关智能体的功能支持模块发挥作用。
两者之间的关系可以用下图来表示:
flowchart LR
    subgraph Lagent
        tool[调用工具]
        subgraph AgentLego
            tool_support[工具功能支持]
        end
        tool_output(工具输出)
        tool --> tool_support --> tool_output
    end

    input(输入) --> LLM[大语言模型]
    LLM --> IF{是否需要调用工具}
    IF -->|否| output(一般输出)
    IF -->|是| tool
    tool_output -->|处理| agent_output(智能体输出)
1.4 环境配置
1.4.1 创建开发机和 conda 环境
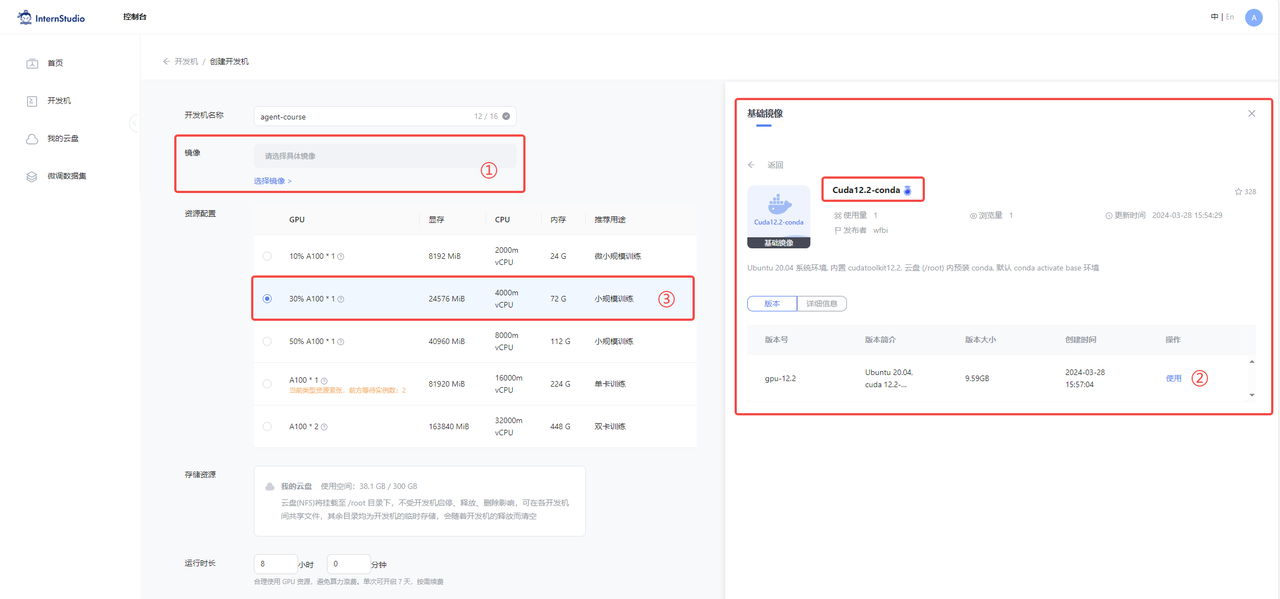
在创建开发机界面选择镜像为 Cuda12.2-conda,并选择 GPU 为30% A100。
进入开发机后,为了方便使用,我们需要配置一个环境以同时满足 Lagent 和 AgentLego 运行时所需依赖。在开始配置环境前,我们先创建一个用于存放 Agent 相关文件的目录,可以执行如下命令:
mkdir -p /root/agent接下来,我们开始配置 conda 环境,可以输入如下指令:
studio-conda -t agent -o pytorch-2.1.2显示下图就是初始化环境成功了。
非 InterStudio 开发机环境配置
如果是在非 InternStudio 开发机上配置环境,则可以通过如下指令创建初始环境:
conda create -n agent
conda activate agent
conda install python=3.10
conda install pytorch==2.1.2 torchvision==0.16.2 torchaudio==2.1.2 pytorch-cuda=11.8 -c pytorch -c nvidia
1.4.2 安装 Lagent 和 AgentLego
Lagent 和 AgentLego 都提供了两种安装方法,一种是通过 pip 直接进行安装,另一种则是从源码进行安装。为了方便使用 Lagent 的 Web Demo 以及 AgentLego 的 WebUI,我们选择直接从源码进行安装。 此处附上源码安装的相关帮助文档:
- Lagent:https://lagent.readthedocs.io/zh-cn/latest/get_started/install.html
- AgentLego:https://agentlego.readthedocs.io/zh-cn/latest/get_started.html
可以执行如下命令进行安装:
cd /root/agent
conda activate agent
git clone https://gitee.com/internlm/lagent.git
cd lagent && git checkout 581d9fb && pip install -e . && cd ..
git clone https://gitee.com/internlm/agentlego.git
cd agentlego && git checkout 7769e0d && pip install -e . && cd ..
1.4.3 安装其他依赖
在这一步中,我们将会安装其他将要用到的依赖库,如 LMDeploy,可以执行如下命令:
conda activate agent
pip install lmdeploy==0.3.0
1.4.4 准备 Tutorial
由于后续的 Demo 需要用到 tutorial 已经写好的脚本,因此我们需要将 tutorial 通过 git clone 的方法准备好,以备后续使用:
cd /root/agent
git clone -b camp2 https://gitee.com/internlm/Tutorial.git
Lagent:轻量级智能体框架
1. Lagent Web Demo
1.1 使用 LMDeploy 部署
由于 Lagent 的 Web Demo 需要用到 LMDeploy 所启动的 api_server,因此我们首先按照下图指示在 vscode terminal 中执行如下代码使用 LMDeploy 启动一个 api_server。
conda activate agent
lmdeploy serve api_server /root/share/new_models/Shanghai_AI_Laboratory/internlm2-chat-7b \
                            --server-name 127.0.0.1 \
                            --model-name internlm2-chat-7b \
                            --cache-max-entry-count 0.1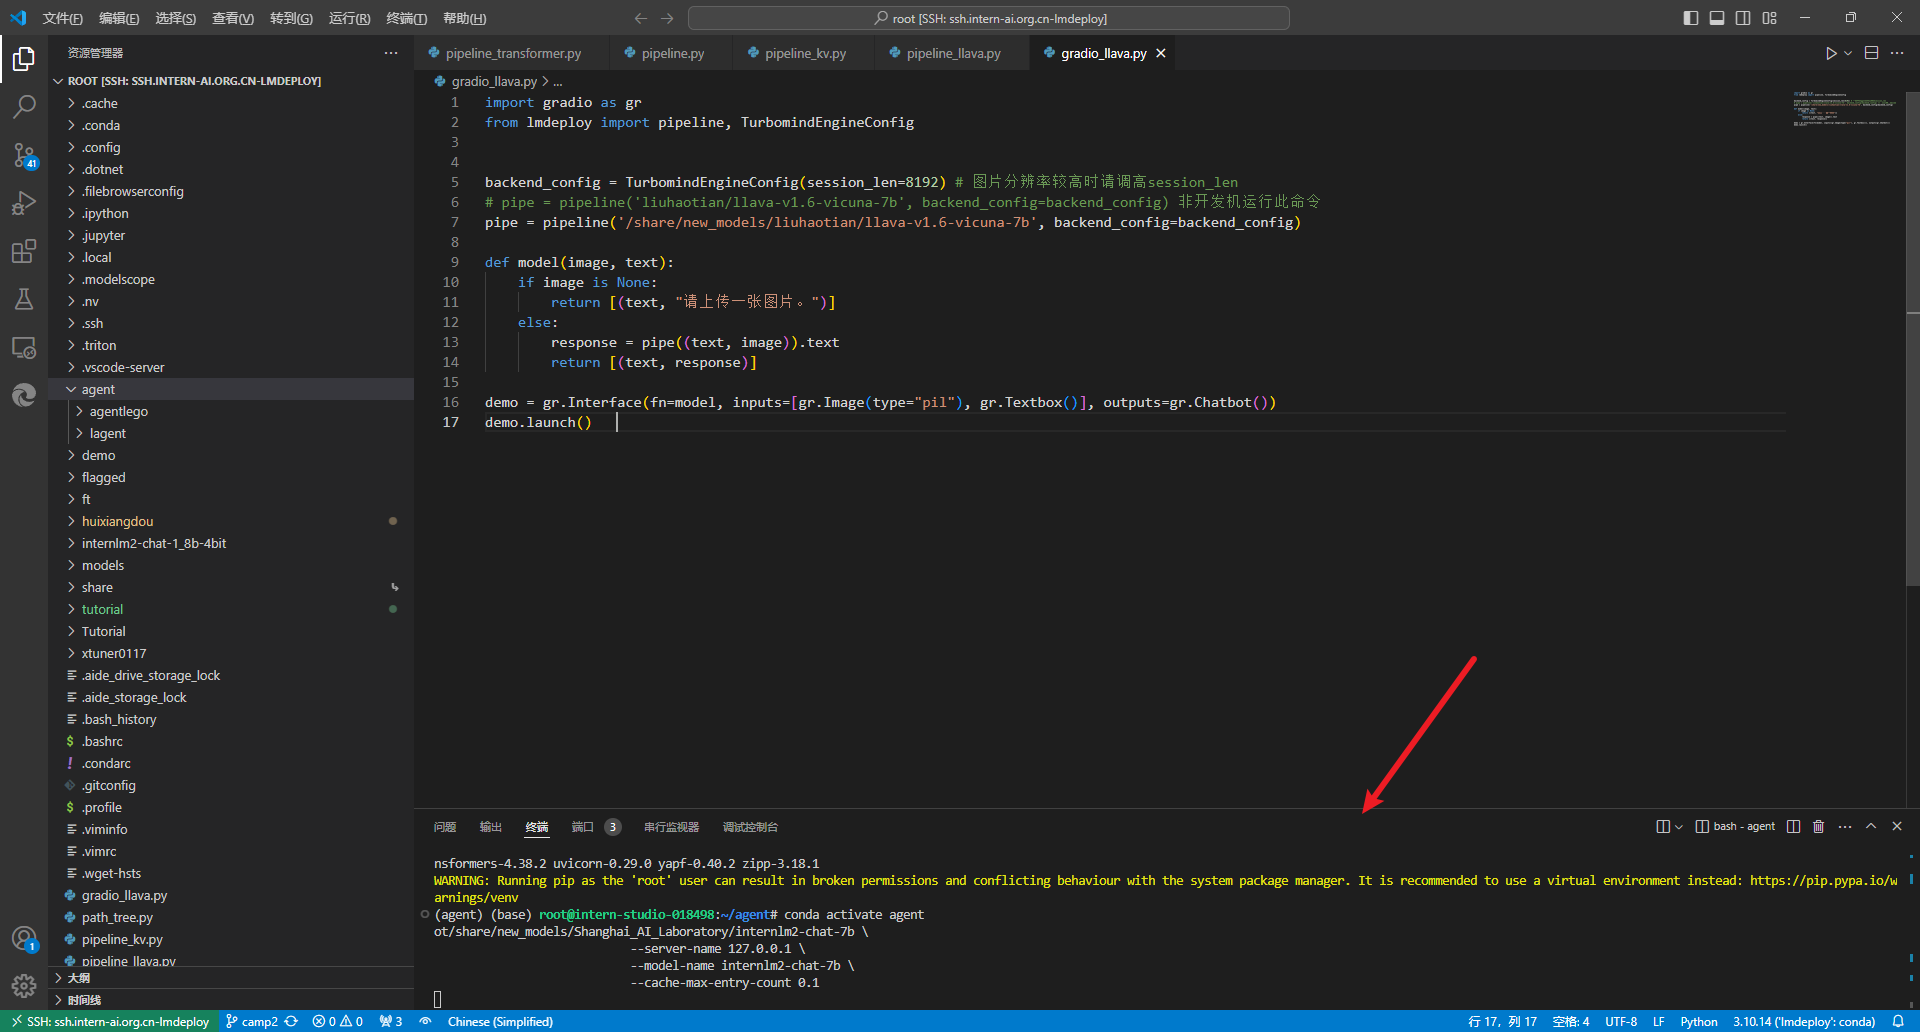
1.2 启动并使用 Lagent Web Demo
接下来我们按照下图指示新建一个 terminal 以启动 Lagent Web Demo。在新建的 terminal 中执行如下指令:
conda activate agent
cd /root/agent/lagent/examples
streamlit run internlm2_agent_web_demo.py --server.address 127.0.0.1 --server.port 7860
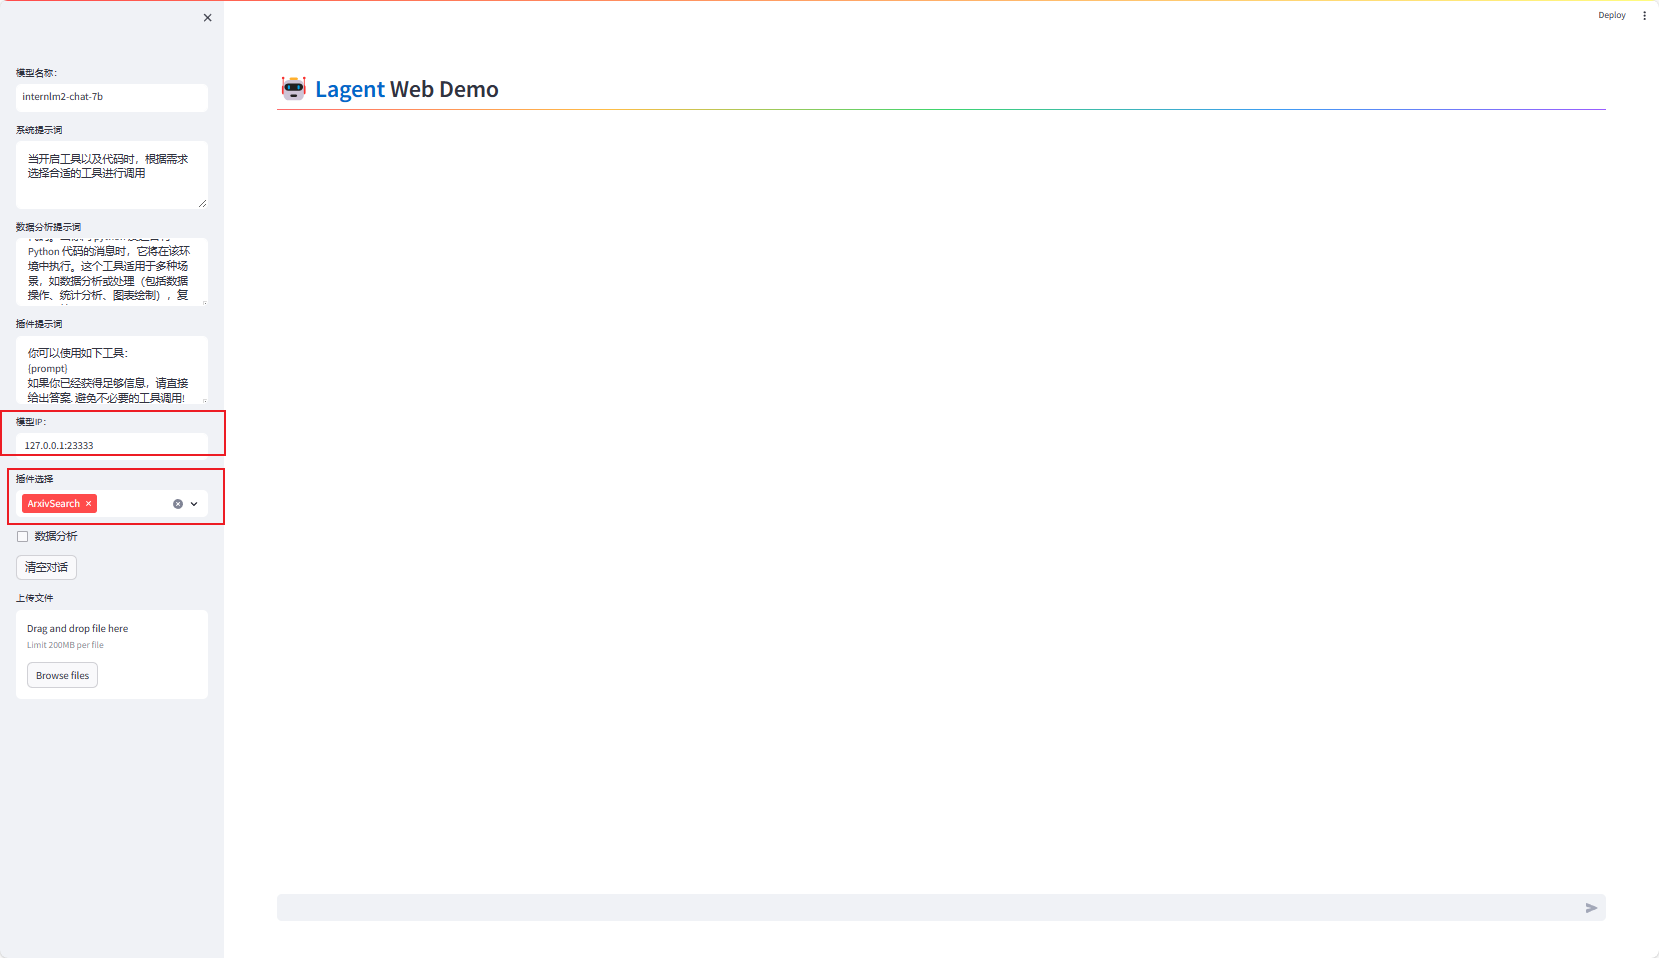
接下来在本地的浏览器页面中打开 http://localhost:7860 以使用 Lagent Web Demo。首先输入模型 IP 为 127.0.0.1:23333,在输入完成后按下回车键以确认。并选择插件为 ArxivSearch,以让模型获得在 arxiv 上搜索论文的能力。
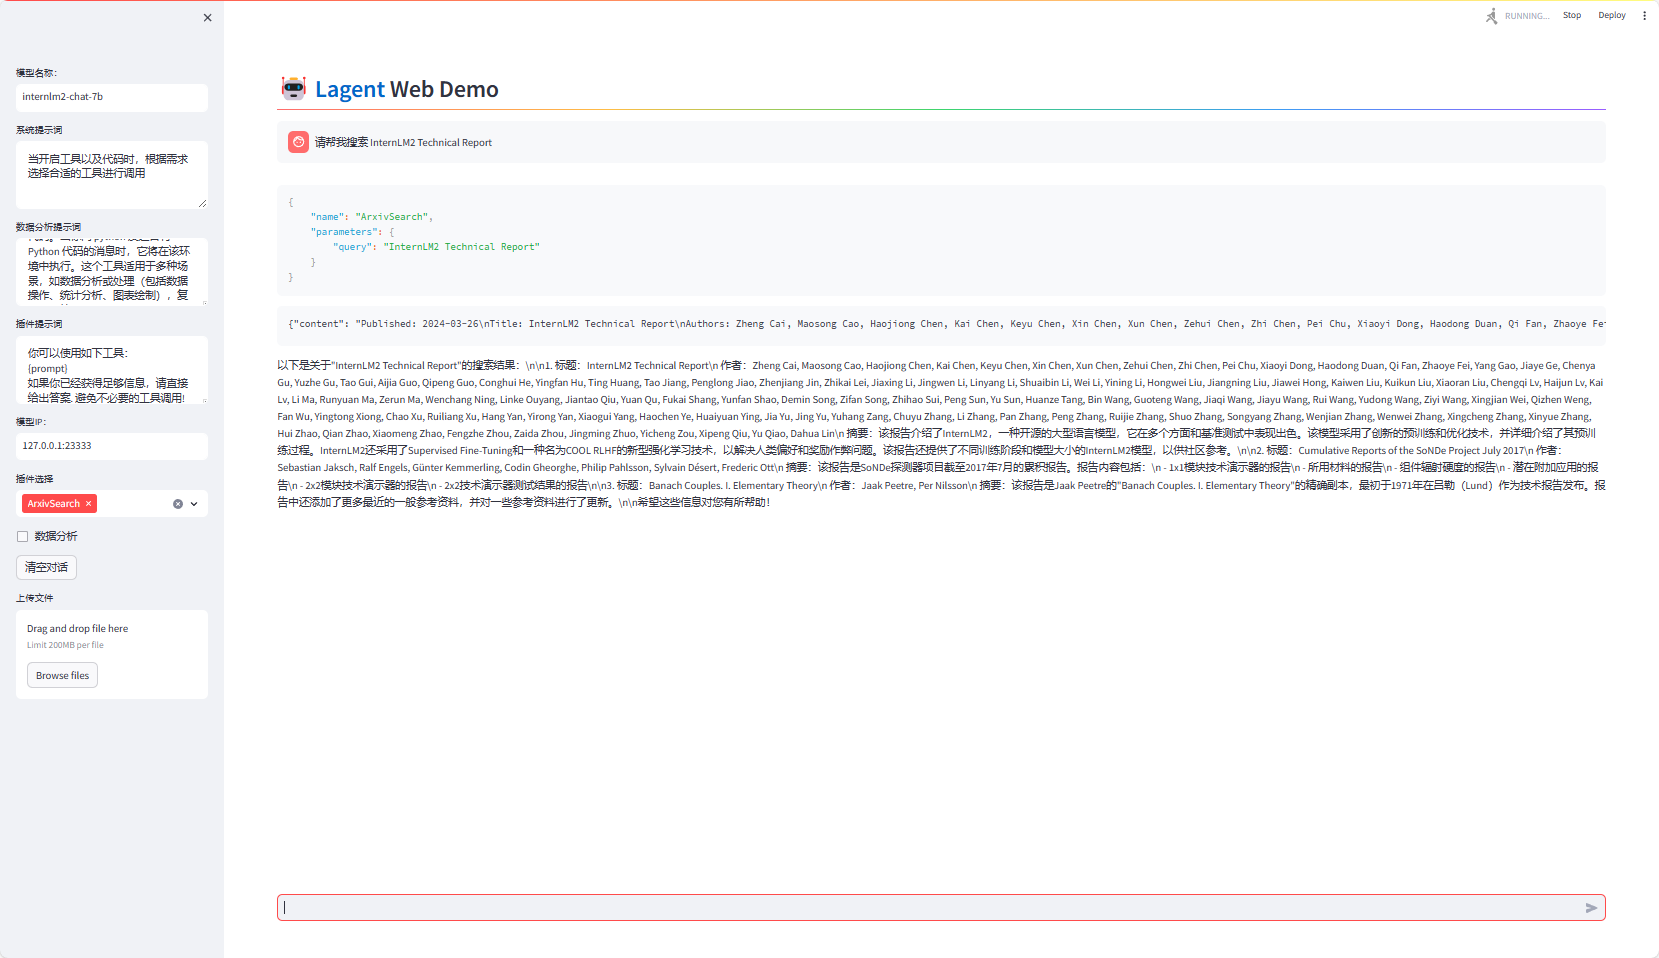
我们输入“请帮我搜索 InternLM2 Technical Report” 以让模型搜索书生·浦语2的技术报告。效果如下图所示,可以看到模型正确输出了 InternLM2 技术报告的相关信息。尽管还输出了其他论文,但这是由 arxiv 搜索 API 的相关行为导致的。
2.1 创建工具文件
首先通过 touch /root/agent/lagent/lagent/actions/weather.py(大小写敏感)新建工具文件,该文件内容如下:
import json
import os
import requests
from typing import Optional, Type

from lagent.actions.base_action import BaseAction, tool_api
from lagent.actions.parser import BaseParser, JsonParser
from lagent.schema import ActionReturn, ActionStatusCode

class WeatherQuery(BaseAction):
    """Weather plugin for querying weather information."""

    def __init__(self,
                 key: Optional[str] = None,
                 description: Optional[dict] = None,
                 parser: Type[BaseParser] = JsonParser,
                 enable: bool = True) -> None:
        super().__init__(description, parser, enable)
        key = os.environ.get('WEATHER_API_KEY', key)
        if key is None:
            raise ValueError(
                'Please set Weather API key either in the environment '
                'as WEATHER_API_KEY or pass it as `key`')
        self.key = key
        self.location_query_url = 'https://geoapi.qweather.com/v2/city/lookup'
        self.weather_query_url = 'https://devapi.qweather.com/v7/weather/now'

    @tool_api
    def run(self, query: str) -> ActionReturn:
        """一个天气查询API。可以根据城市名查询天气信息。

        Args:
            query (:class:`str`): The city name to query.
        """
        tool_return = ActionReturn(type=self.name)
        status_code, response = self._search(query)
        if status_code == -1:
            tool_return.errmsg = response
            tool_return.state = ActionStatusCode.HTTP_ERROR
        elif status_code == 200:
            parsed_res = self._parse_results(response)
            tool_return.result = [dict(type='text', content=str(parsed_res))]
            tool_return.state = ActionStatusCode.SUCCESS
        else:
            tool_return.errmsg = str(status_code)
            tool_return.state = ActionStatusCode.API_ERROR
        return tool_return

    def _parse_results(self, results: dict) -> str:
        """Parse the weather results from QWeather API.

        Args:
            results (dict): The weather content from QWeather API
                in json format.

        Returns:
            str: The parsed weather results.
        """
        now = results['now']
        data = [
            f'数据观测时间: {now["obsTime"]}',
            f'温度: {now["temp"]}°C',
            f'体感温度: {now["feelsLike"]}°C',
            f'天气: {now["text"]}',
            f'风向: {now["windDir"]},角度为 {now["wind360"]}°',
            f'风力等级: {now["windScale"]},风速为 {now["windSpeed"]} km/h',
            f'相对湿度: {now["humidity"]}',
            f'当前小时累计降水量: {now["precip"]} mm',
            f'大气压强: {now["pressure"]} 百帕',
            f'能见度: {now["vis"]} km',
        ]
        return '\n'.join(data)

    def _search(self, query: str):
        # get city_code
        try:
            city_code_response = requests.get(
                self.location_query_url,
                params={'key': self.key, 'location': query}
            )
        except Exception as e:
            return -1, str(e)
        if city_code_response.status_code != 200:
            return city_code_response.status_code, city_code_response.json()
        city_code_response = city_code_response.json()
        if len(city_code_response['location']) == 0:
            return -1, '未查询到城市'
        city_code = city_code_response['location'][0]['id']
        # get weather
        try:
            weather_response = requests.get(
                self.weather_query_url,
                params={'key': self.key, 'location': city_code}
            )
        except Exception as e:
            return -1, str(e)
        return weather_response.status_code, weather_response.json()
2.2 获取 API KEY
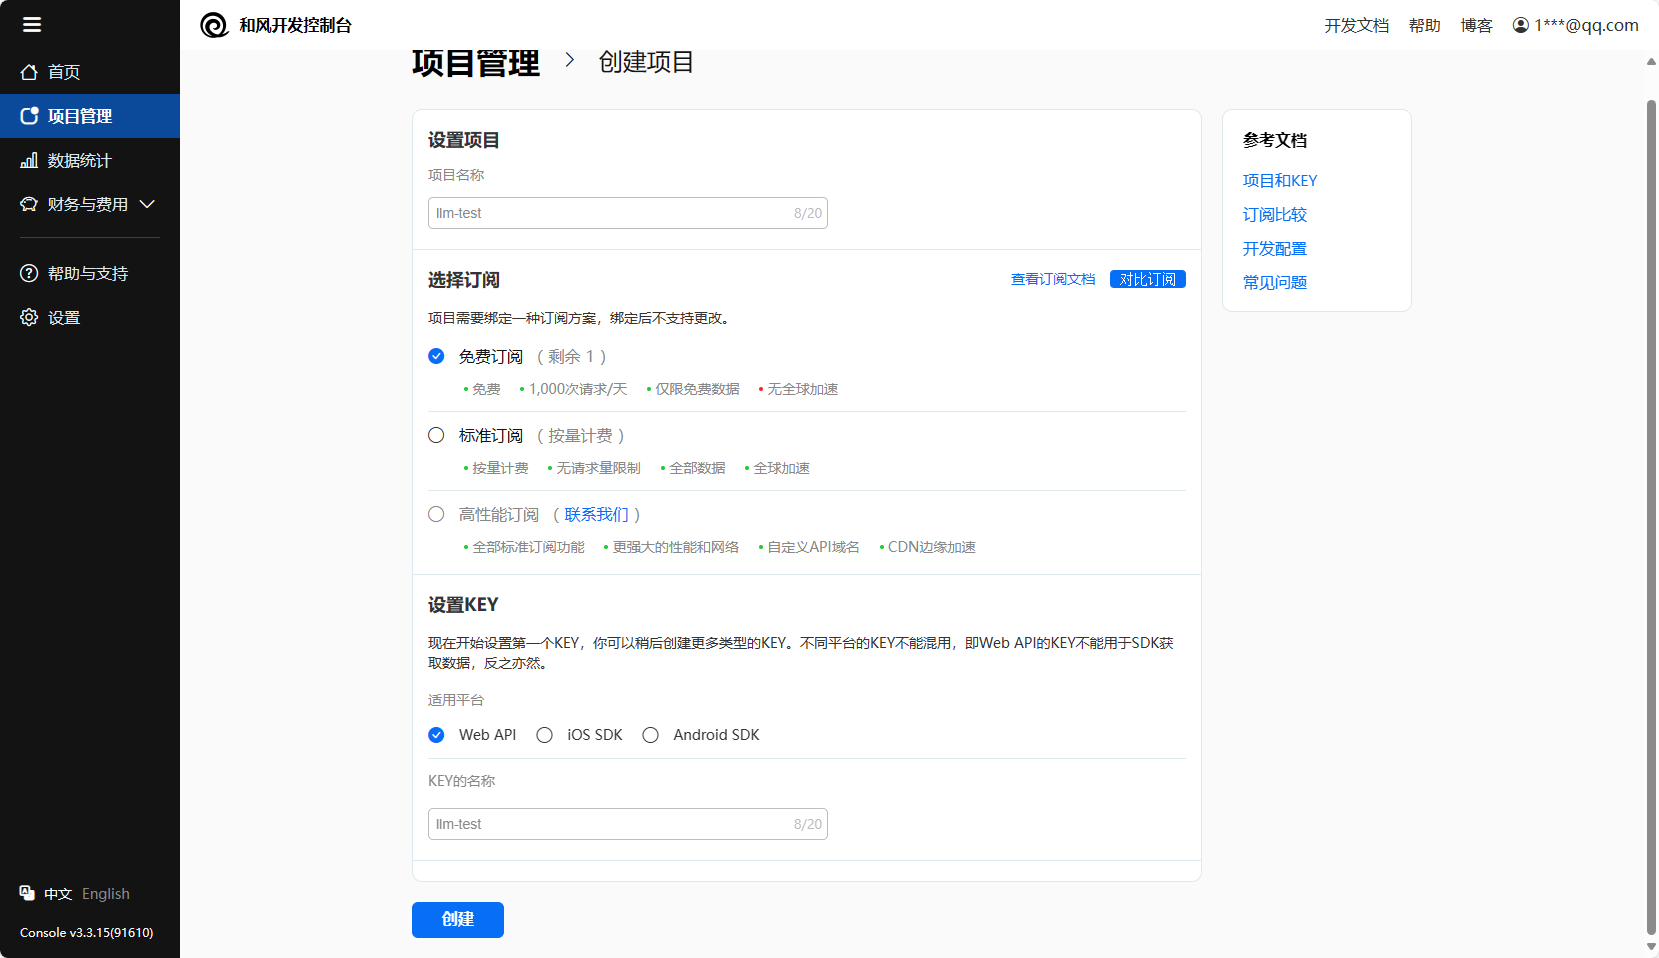
为了获得稳定的天气查询服务,我们首先要获取 API KEY。首先打开 https://dev.qweather.com/docs/api/ 后,点击右上角控制台。(如下图所示)
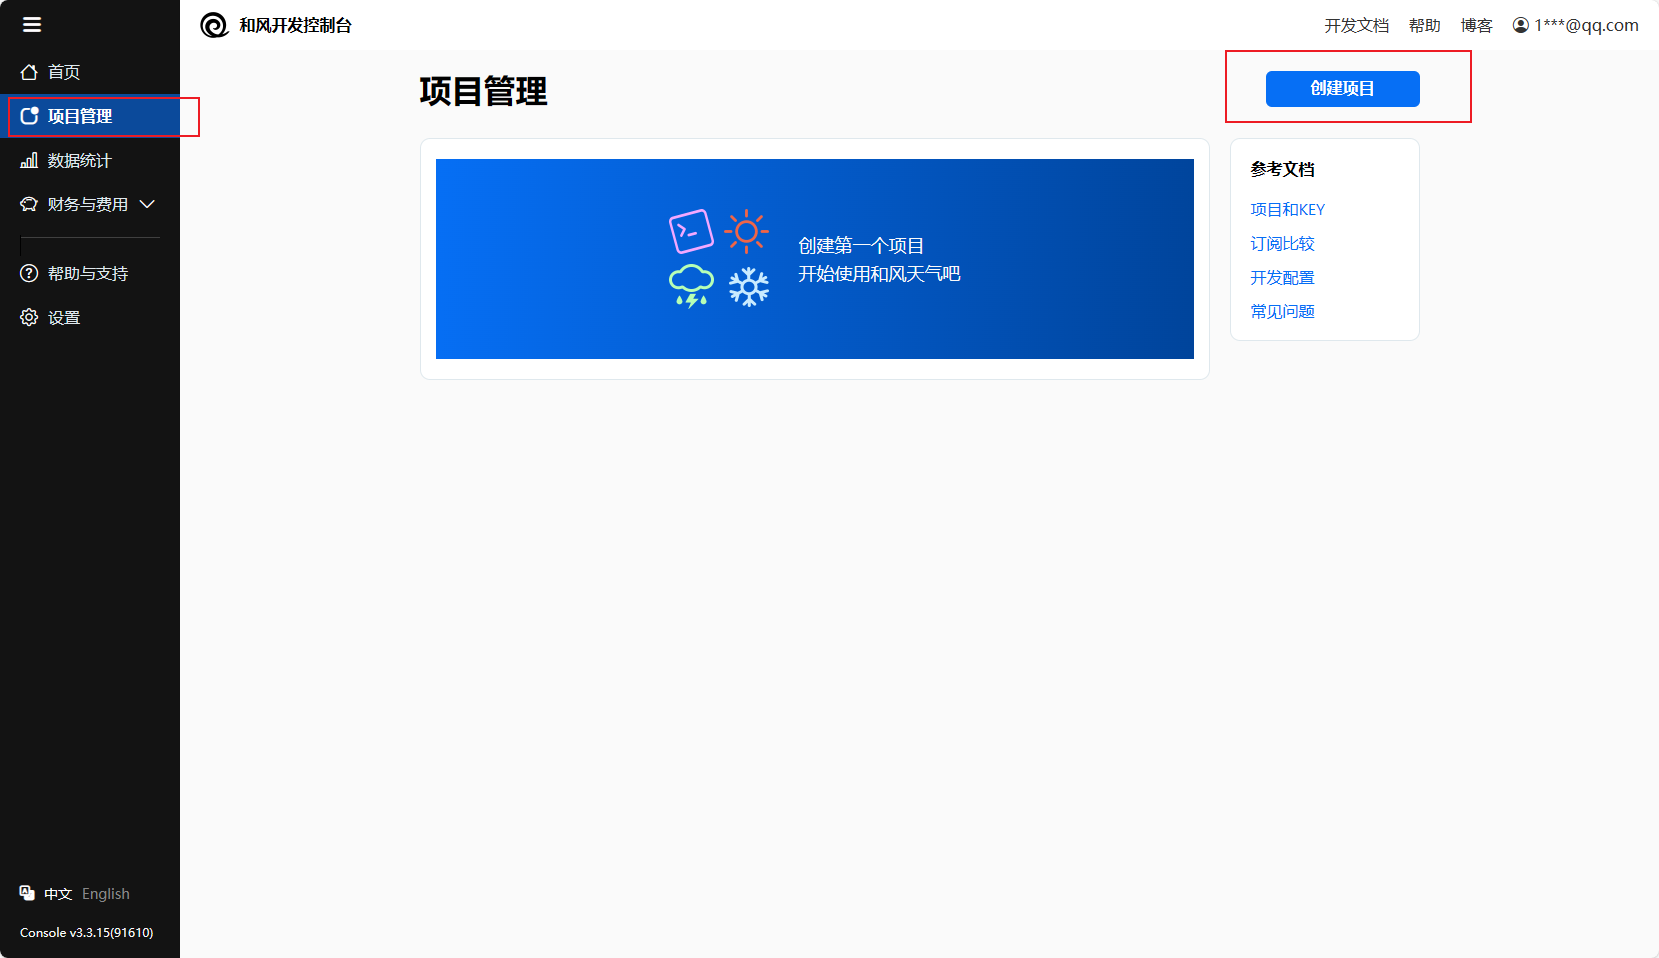
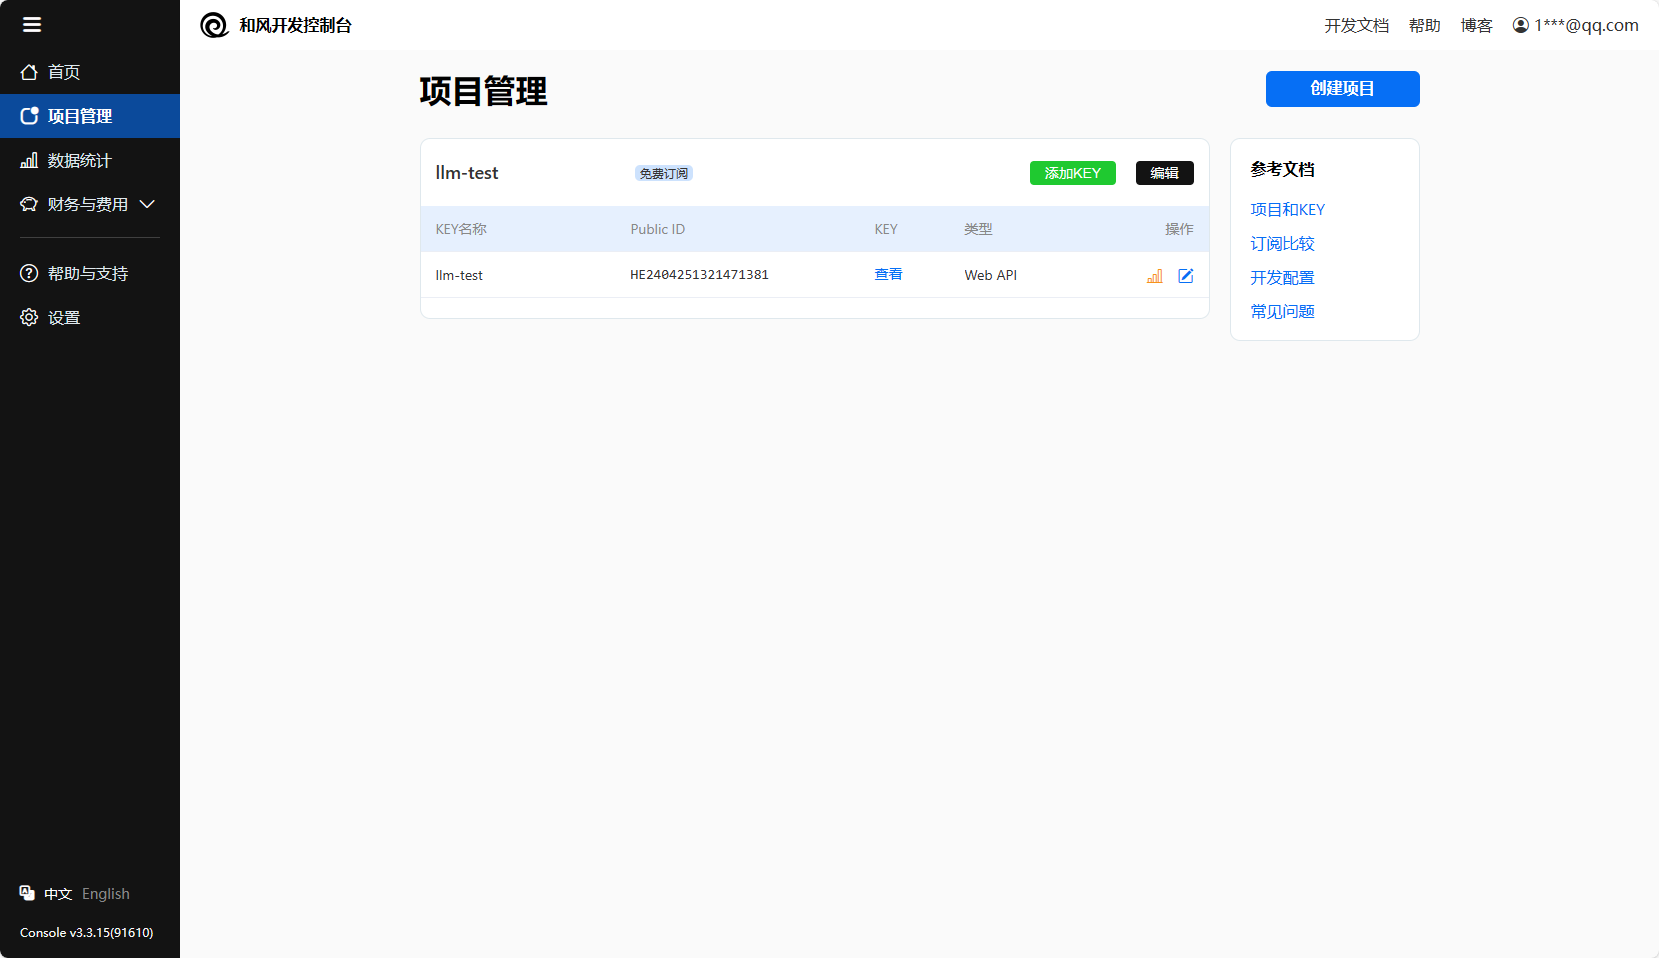
接下来回到项目管理页面,查看我们刚刚创建的 key,并且复制好以供2.3节中使用。(如下图所示)
2.3 体验自定义工具效果
与 1.2 部分类似,我们在两个 terminal 中分别启动 LMDeploy 服务和 Tutorial 已经写好的用于这部分的 Web Demo:
Important
注意,确保 1.1 节中的 LMDeploy 服务以及 1.2 节中的 Web Demo 服务已经停止(即 terminal 已关闭),否则会出现 CUDA Out of Memory 或是端口已占用的情况!
conda activate agent
lmdeploy serve api_server /root/share/new_models/Shanghai_AI_Laboratory/internlm2-chat-7b \
                            --server-name 127.0.0.1 \
                            --model-name internlm2-chat-7b \
                            --cache-max-entry-count 0.1
export WEATHER_API_KEY=在2.2节获取的API KEY
# 比如 export WEATHER_API_KEY=1234567890abcdef
conda activate agent
cd /root/agent/Tutorial/agent
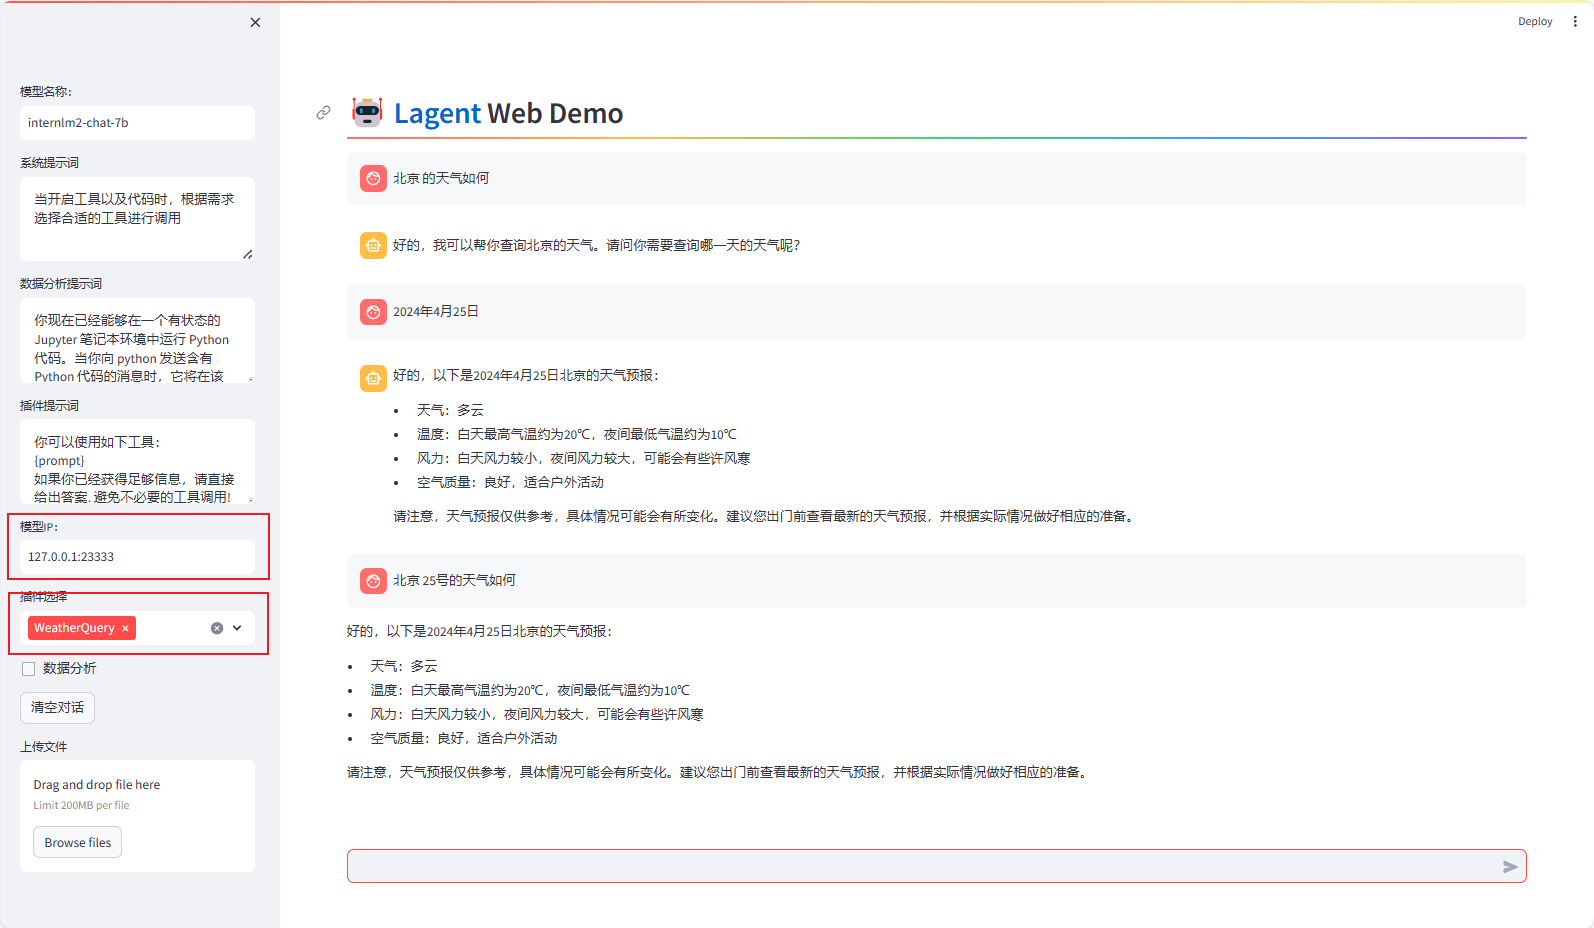
streamlit run internlm2_weather_web_demo.py --server.address 127.0.0.1 --server.port 7860在输入模型地址127.0.0.1:23333并选择好工具后,就可以开始体验了。下图是一个例子:
AgentLego:组装智能体“乐高”
在介绍中我们提到过,AgentLego 算法库既可以直接使用,也可以作为智能体工具使用。下面将分别介绍这两种使用方式。我们将以目标检测工具为例。
1. 直接使用 AgentLego
首先下载 demo 文件:
cd /root/agent
wget http://download.openmmlab.com/agentlego/road.jpg
由于 AgentLego 在安装时并不会安装某个特定工具的依赖,因此我们接下来准备安装目标检测工具运行时所需依赖。
AgentLego 所实现的目标检测工具是基于 mmdet (MMDetection) 算法库中的 RTMDet-Large 模型,因此我们首先安装 mim,然后通过 mim 工具来安装 mmdet。这一步所需时间可能会较长,请耐心等待。
conda activate agent
pip install openmim==0.3.9
mim install mmdet==3.3.0在安装完成后,可能会观察到以下现象(如下图所示),但请放心,这是正常现象,这并不会影响到我们的使用。
然后通过 touch /root/agent/direct_use.py(大小写敏感)的方式在 /root/agent 目录下新建 direct_use.py 以直接使用目标检测工具,direct_use.py 的代码如下:
import re

import cv2
from agentlego.apis import load_tool

# load tool
tool = load_tool('ObjectDetection', device='cuda')

# apply tool
visualization = tool('/root/agent/road.jpg')
print(visualization)

# visualize
image = cv2.imread('/root/agent/road.jpg')

preds = visualization.split('\n')
pattern = r'(\w+) \((\d+), (\d+), (\d+), (\d+)\), score (\d+)'

for pred in preds:
    name, x1, y1, x2, y2, score = re.match(pattern, pred).groups()
    x1, y1, x2, y2, score = int(x1), int(y1), int(x2), int(y2), int(score)
    cv2.rectangle(image, (x1, y1), (x2, y2), (0, 255, 0), 1)
    cv2.putText(image, f'{name} {score}', (x1, y1), cv2.FONT_HERSHEY_SIMPLEX, 0.8, (0, 255, 0), 1)

cv2.imwrite('/root/agent/road_detection_direct.jpg', image)
此时文件树结构如下:
/root/agent
├── agentlego
│   ├── agentlego
│   ├── docs
│   ├── examples
│   ├── LICENSE
│   └── ...
├── lagent
│   ├── docs
│   ├── examples
│   ├── lagent
│   ├── LICENSE
│   └── ...
├── Tutorial
│   ├── assets
│   ├── agent
│   ├── helloword
│   ├── huixiangdou
│   └── ...
├── direct_use.py
└── road.jpg
接下来在执行 python /root/agent/direct_use.py 以进行推理。在等待 RTMDet-Large 权重下载并推理完成后,我们就可以看到如下输出以及一张位于 /root/agent 名为 road_detection_direct.jpg 的图片:
Inference ━━━━━━━━━━━━━━━━━━━━━━━━━━━━━━━━━━━━━━━━
truck (345, 428, 528, 599), score 83
car (771, 510, 837, 565), score 81
car (604, 518, 677, 569), score 75
person (866, 503, 905, 595), score 74
person (287, 513, 320, 596), score 74
person (964, 501, 999, 604), score 72
person (1009, 503, 1047, 602), score 69
person (259, 510, 279, 575), score 65
car (1074, 524, 1275, 691), score 64
person (993, 508, 1016, 597), score 62
truck (689, 483, 764, 561), score 62
bicycle (873, 551, 903, 602), score 60
person (680, 523, 699, 567), score 55
bicycle (968, 551, 996, 609), score 53
bus (826, 482, 930, 560), score 52
bicycle (1011, 551, 1043, 617), score 51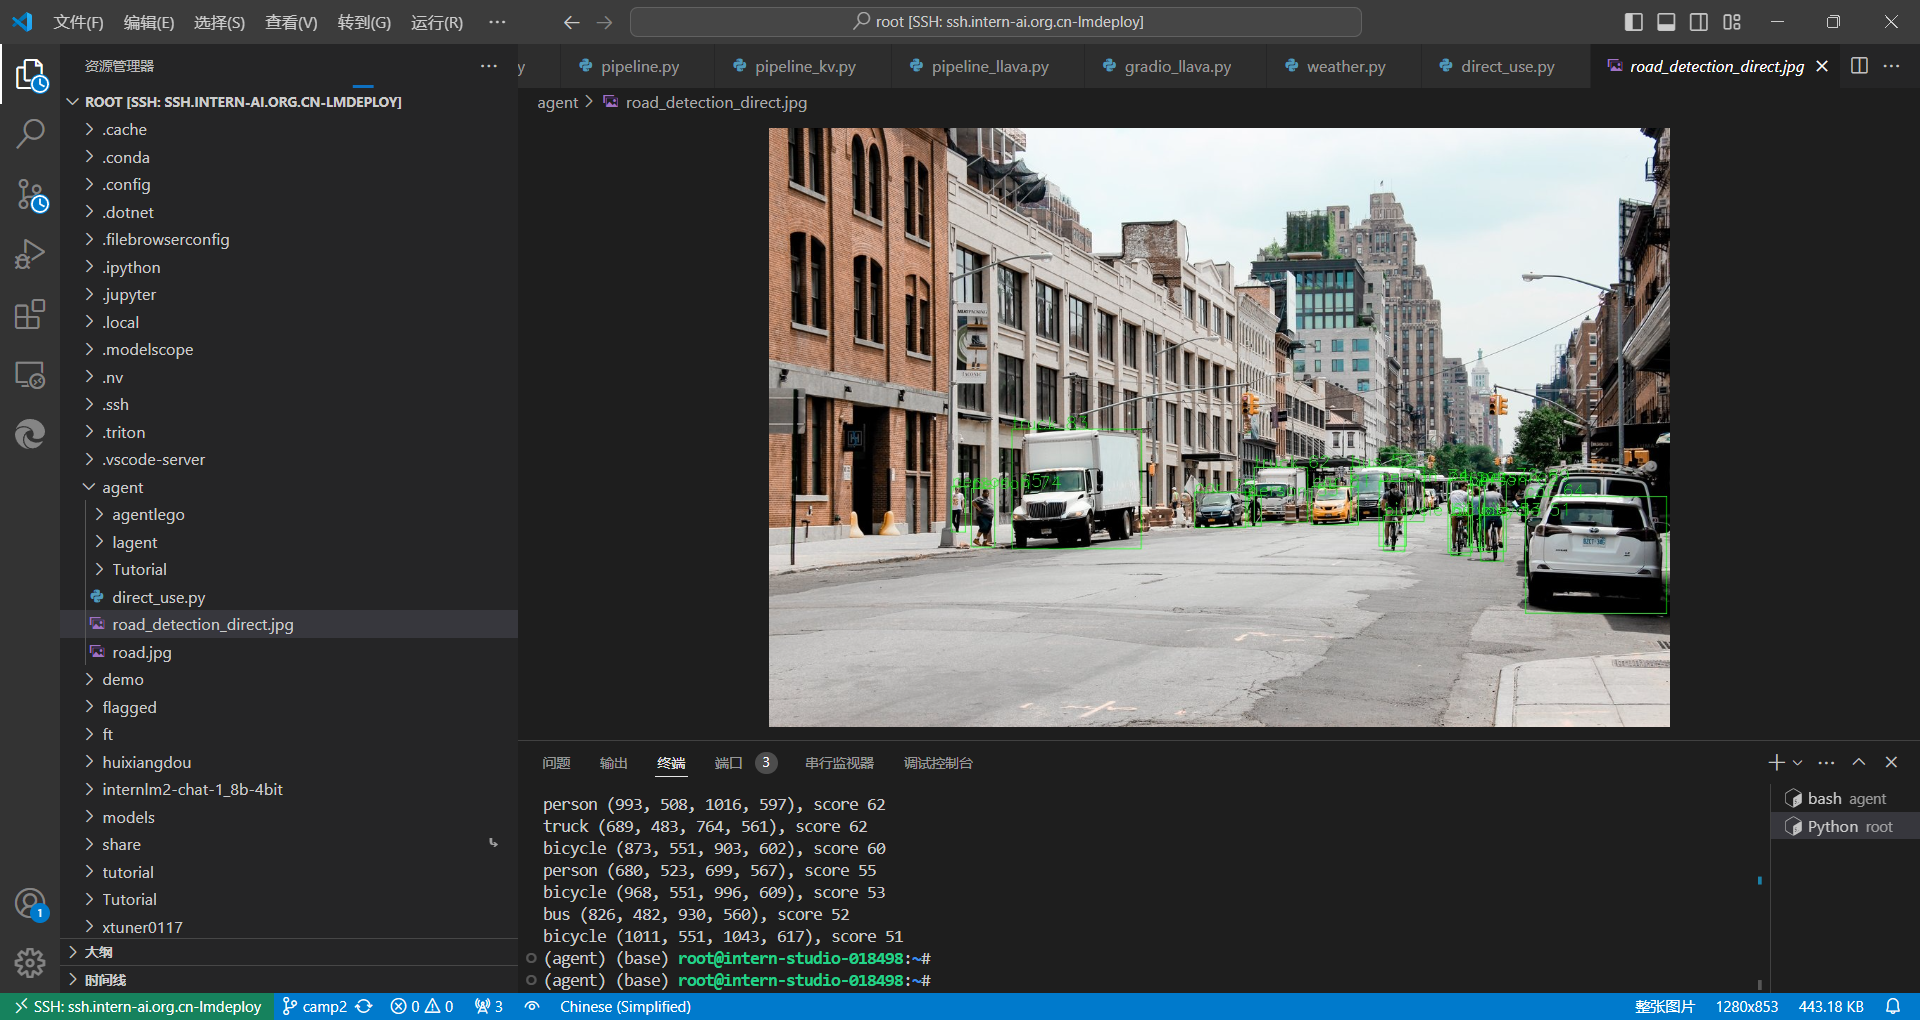
| 原图 | 结果 |
|---|---|
 |
 |
2 作为智能体工具使用
2.1 修改相关文件
由于 AgentLego 算法库默认使用 InternLM2-Chat-20B 模型,因此我们首先需要修改 /root/agent/agentlego/webui/modules/agents/lagent_agent.py 文件的第 105行位置,将 internlm2-chat-20b 修改为 internlm2-chat-7b,即
def llm_internlm2_lmdeploy(cfg):
    url = cfg['url'].strip()
    llm = LMDeployClient(
-         model_name='internlm2-chat-20b',
+         model_name='internlm2-chat-7b',
        url=url,
        meta_template=INTERNLM2_META,
        top_p=0.8,
        top_k=100,
        temperature=cfg.get('temperature', 0.7),
        repetition_penalty=1.0,
        stop_words=['<|im_end|>'])
    return llm
2.2 使用 LMDeploy 部署
由于 AgentLego 的 WebUI 需要用到 LMDeploy 所启动的 api_server,因此我们首先按照下图指示在 vscode terminal 中执行如下代码使用 LMDeploy 启动一个 api_server。
conda activate agent
lmdeploy serve api_server /root/share/new_models/Shanghai_AI_Laboratory/internlm2-chat-7b \
                            --server-name 127.0.0.1 \
                            --model-name internlm2-chat-7b \
                            --cache-max-entry-count 0.1
2.3 启动 AgentLego WebUI
接下来我们按照下图指示新建一个 terminal 以启动 AgentLego WebUI。在新建的 terminal 中执行如下指令:
conda activate agent
cd /root/agent/agentlego/webui
python one_click.py
2.4 使用 AgentLego WebUI
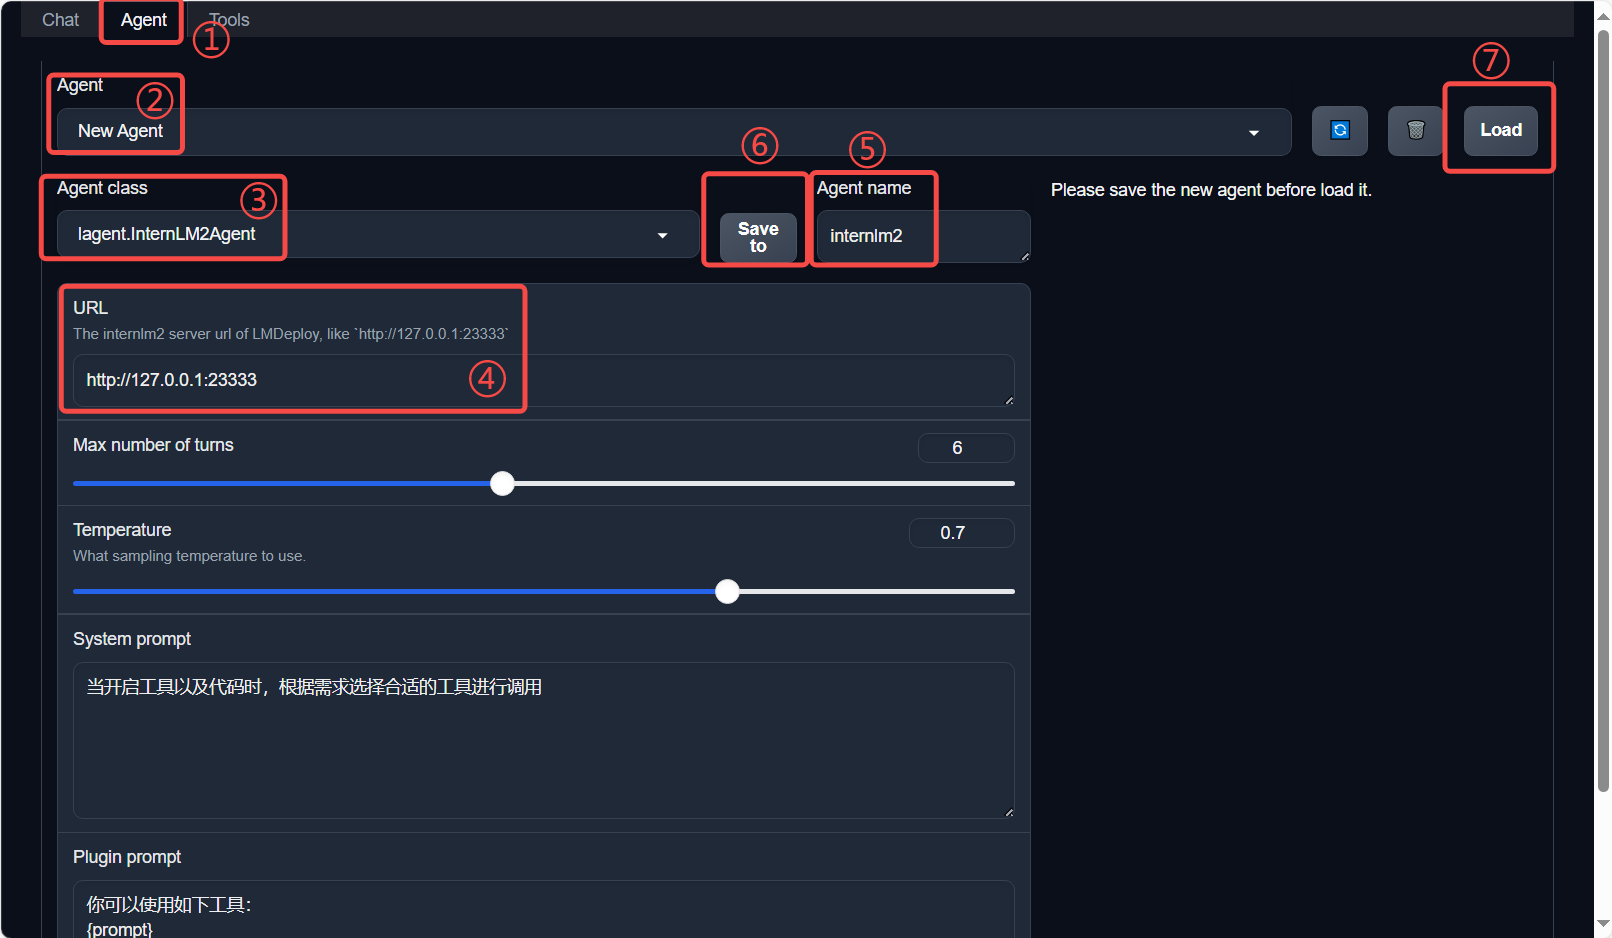
接下来在本地的浏览器页面中打开 http://localhost:7860 以使用 AgentLego WebUI。首先来配置 Agent,如下图所示。
- 点击上方 Agent 进入 Agent 配置页面。(如①所示)
- 点击 Agent 下方框,选择 New Agent。(如②所示)
- 选择 Agent Class 为 lagent.InternLM2Agent。(如③所示)
- 输入模型 URL 为 http://127.0.0.1:23333 。(如④所示)
- 输入 Agent name,自定义即可,图中输入了 internlm2。(如⑤所示)
- 点击 save to 以保存配置,这样在下次使用时只需在第2步时选择 Agent 为 internlm2 后点击 load 以加载就可以了。(如⑥所示)
- 点击 load 以加载配置。(如⑦所示)
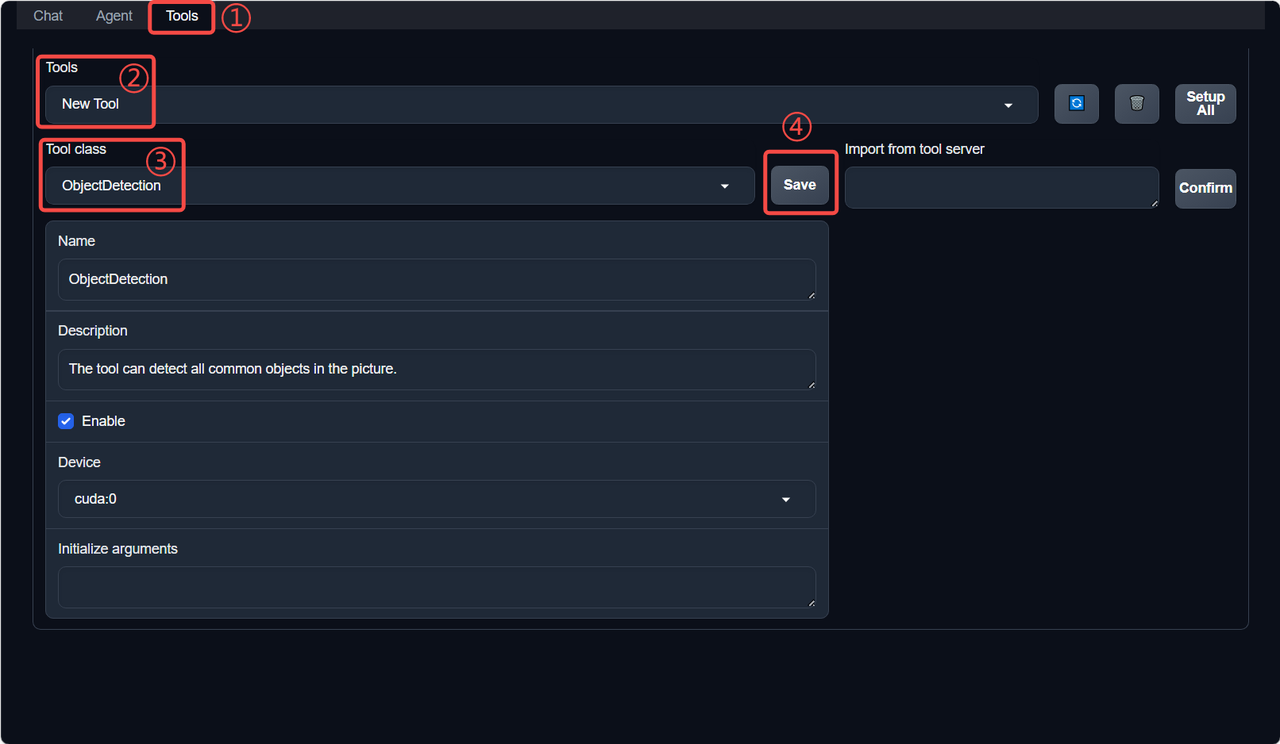
然后配置工具,如下图所示。
- 点击上方 Tools 页面进入工具配置页面。(如①所示)
- 点击 Tools 下方框,选择 New Tool 以加载新工具。(如②所示)
- 选择 Tool Class 为 ObjectDetection。(如③所示)
- 点击 save 以保存配置。(如④所示)
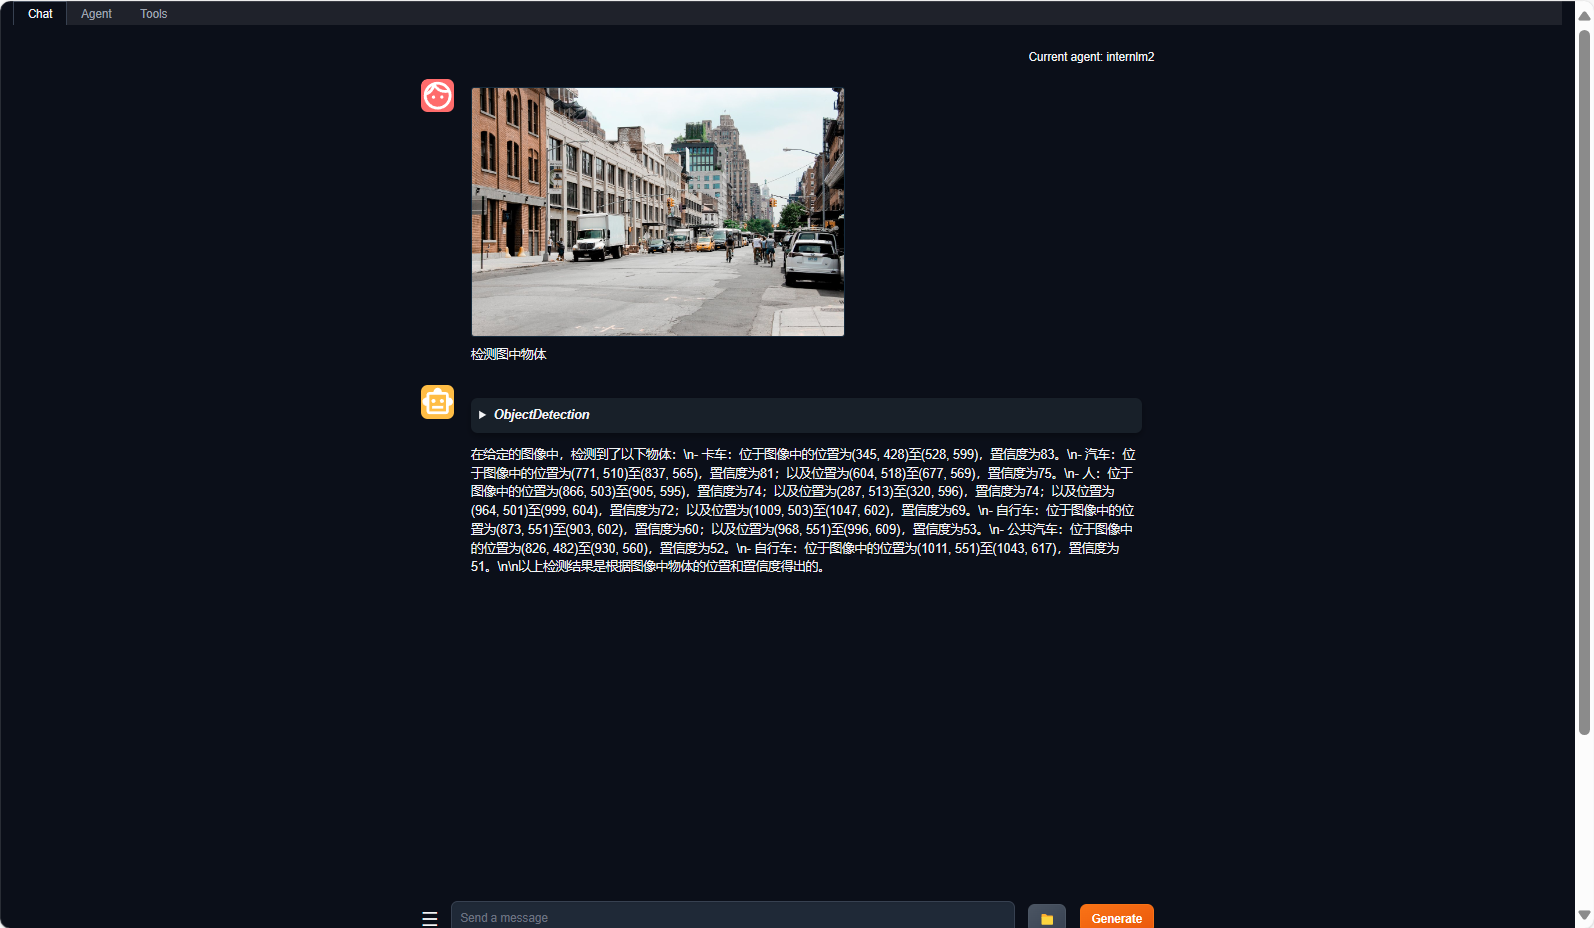
等待工具加载完成后,点击上方 Chat 以进入对话页面。在页面下方选择工具部分只选择 ObjectDetection 工具,如下图所示。为了确保调用工具的成功率,请在使用时确保仅有这一个工具启用。
接下来就可以愉快地使用 Agent 了。点击右下角文件夹以上传图片,上传图片后输入指令并点击 generate 以得到模型回复。如下图所示,我们上传了 demo 图片,模型成功地调用了工具,并详细地告诉了我们图中的内容。
3. 用 AgentLego 自定义工具
在本节中,我们将基于 AgentLego 构建自己的自定义工具。AgentLego 在这方面提供了较为详尽的文档,文档地址为 https://agentlego.readthedocs.io/zh-cn/latest/modules/tool.html 。自定义工具主要分为以下几步:
- 继承 BaseTool 类
- 修改 default_desc 属性(工具功能描述)
- 如有需要,重载 setup 方法(重型模块延迟加载)
- 重载 apply 方法(工具功能实现)
其中第一二四步是必须的步骤。下面我们将实现一个调用 MagicMaker 的 API 以实现图像生成的工具。
MagicMaker 是汇聚了优秀 AI 算法成果的免费 AI 视觉素材生成与创作平台。主要提供图像生成、图像编辑和视频生成三大核心功能,全面满足用户在各种应用场景下的视觉素材创作需求。体验更多功能可以访问 https://magicmaker.openxlab.org.cn/home 。
3.1 创建工具文件
首先通过 touch /root/agent/agentlego/agentlego/tools/magicmaker_image_generation.py(大小写敏感)的方法新建工具文件。该文件的内容如下:
import json
import requests

import numpy as np

from agentlego.types import Annotated, ImageIO, Info
from agentlego.utils import require
from .base import BaseTool

class MagicMakerImageGeneration(BaseTool):

    default_desc = ('This tool can call the api of magicmaker to '
                    'generate an image according to the given keywords.')

    styles_option = [
        'dongman',  # 动漫
        'guofeng',  # 国风
        'xieshi',   # 写实
        'youhua',   # 油画
        'manghe',   # 盲盒
    ]
    aspect_ratio_options = [
        '16:9', '4:3', '3:2', '1:1',
        '2:3', '3:4', '9:16'
    ]

    @require('opencv-python')
    def __init__(self,
                 style='guofeng',
                 aspect_ratio='4:3'):
        super().__init__()
        if style in self.styles_option:
            self.style = style
        else:
            raise ValueError(f'The style must be one of {self.styles_option}')

        if aspect_ratio in self.aspect_ratio_options:
            self.aspect_ratio = aspect_ratio
        else:
            raise ValueError(f'The aspect ratio must be one of {aspect_ratio}')

    def apply(self,
              keywords: Annotated[str,
                                  Info('A series of Chinese keywords separated by comma.')]
        ) -> ImageIO:
        import cv2
        response = requests.post(
            url='https://magicmaker.openxlab.org.cn/gw/edit-anything/api/v1/bff/sd/generate',
            data=json.dumps({
                "official": True,
                "prompt": keywords,
                "style": self.style,
                "poseT": False,
                "aspectRatio": self.aspect_ratio
            }),
            headers={'content-type': 'application/json'}
        )
        image_url = response.json()['data']['imgUrl']
        image_response = requests.get(image_url)
        image = cv2.cvtColor(cv2.imdecode(np.frombuffer(image_response.content, np.uint8), cv2.IMREAD_COLOR),cv2.COLOR_BGR2RGB)
        return ImageIO(image)
3.2 注册新工具
接下来修改 /root/agent/agentlego/agentlego/tools/__init__.py 文件,将我们的工具注册在工具列表中。如下所示,我们将 MagicMakerImageGeneration 通过 from .magicmaker_image_generation import MagicMakerImageGeneration 导入到了文件中,并且将其加入了 all 列表中。
from .base import BaseTool
from .calculator import Calculator
from .func import make_tool
from .image_canny import CannyTextToImage, ImageToCanny
from .image_depth import DepthTextToImage, ImageToDepth
from .image_editing import ImageExpansion, ImageStylization, ObjectRemove, ObjectReplace
from .image_pose import HumanBodyPose, HumanFaceLandmark, PoseToImage
from .image_scribble import ImageToScribble, ScribbleTextToImage
from .image_text import ImageDescription, TextToImage
from .imagebind import AudioImageToImage, AudioTextToImage, AudioToImage, ThermalToImage
from .object_detection import ObjectDetection, TextToBbox
from .ocr import OCR
from .scholar import *  # noqa: F401, F403
from .search import BingSearch, GoogleSearch
from .segmentation import SegmentAnything, SegmentObject, SemanticSegmentation
from .speech_text import SpeechToText, TextToSpeech
from .translation import Translation
from .vqa import VQA
from .magicmaker_image_generation import MagicMakerImageGeneration

__all__ = [
    'CannyTextToImage', 'ImageToCanny', 'DepthTextToImage', 'ImageToDepth',
    'ImageExpansion', 'ObjectRemove', 'ObjectReplace', 'HumanFaceLandmark',
    'HumanBodyPose', 'PoseToImage', 'ImageToScribble', 'ScribbleTextToImage',
    'ImageDescription', 'TextToImage', 'VQA', 'ObjectDetection', 'TextToBbox', 'OCR',
    'SegmentObject', 'SegmentAnything', 'SemanticSegmentation', 'ImageStylization',
    'AudioToImage', 'ThermalToImage', 'AudioImageToImage', 'AudioTextToImage',
    'SpeechToText', 'TextToSpeech', 'Translation', 'GoogleSearch', 'Calculator',
     'BaseTool', 'make_tool', 'BingSearch', 'MagicMakerImageGeneration'
]
3.3 体验自定义工具效果
与2.2,2.3以及2.4节类似,我们在两个 terminal 中分别启动 LMDeploy 服务和 AgentLego 的 WebUI 以体验我们自定义的工具的效果。
注意,确保 2.2 节中的 LMDeploy 服务以及 2.3 节中的 Web Demo 服务已经停止(即 terminal 已关闭),否则会出现 CUDA Out of Memory 或是端口已占用的情况!
api部署
conda activate agent
lmdeploy serve api_server /root/share/new_models/Shanghai_AI_Laboratory/internlm2-chat-7b \
                            --server-name 127.0.0.1 \
                            --model-name internlm2-chat-7b \
                            --cache-max-entry-count 0.1
webUI部署
conda activate agent
cd /root/agent/agentlego/webui
python one_click.py
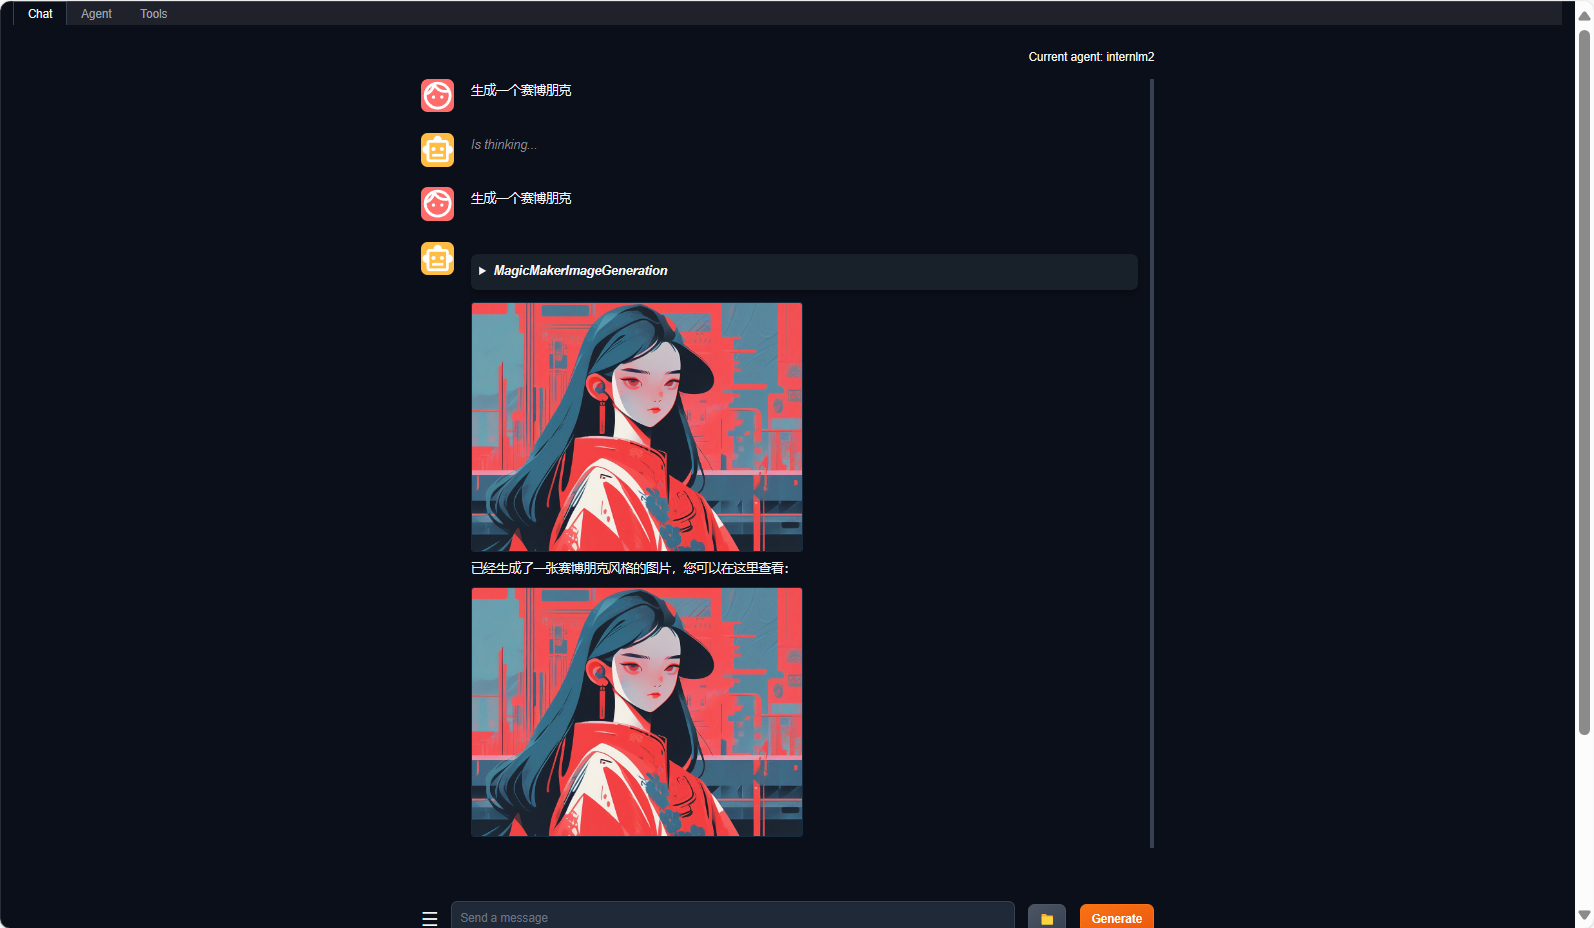
在 Tool 界面选择 MagicMakerImageGeneration 后点击 save 后,回到 Chat 页面选择 MagicMakerImageGeneration 工具后就可以开始使用了。为了确保调用工具的成功率,请在使用时确保仅有这一个工具启用。下图是一个例子。可以看到模型成功地调用了工具并得到了结果。





Comments NOTHING