最近捡垃圾,淘了个超微的服务器主板X11SSH-F,作为服务器主板,最特别的是有IPMI管理功能。
但问题是实现ipmi功能的bmc,顺便把风扇接管了,并且自带的几个风扇模式转速都比较高,适合机房环境,但放到家里就不合适了,于是我开始起了自己写个温控曲线功能脚本的想法。(其他风扇被ipmi接管的主板也可以参考)
硬件配置
这里先介绍一下我的配置,方便类似方案的朋友参考:
1.主板:超微x11ssh-f(其他风扇被ipmi接管的主板也可以参考)
- biso:使用d大的魔改biso(链接)
2.CPU:G5500
3.系统:pve(理论所有linux系统都可用)
BIOS设置
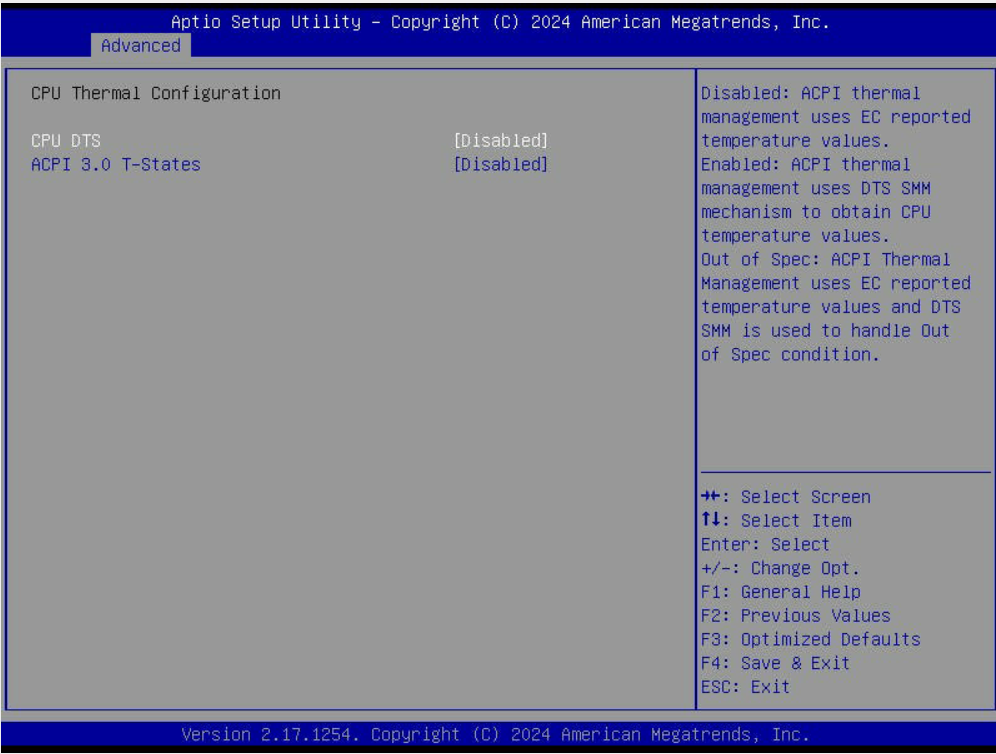
在使用这块主板的前期我发现linux中使用Sensors无法查看cpu温度,折腾了好一段时间,才发现需要将BIOS中的Advanced->CPU Configuration->CPU Thermal Configuration->CPU DTS 禁用,才能正确识别查看温度信息
ps:其实最开始也尝试使用ipmi获取温度信息,但可能因访问间隔小(10s),经常出现获取不到温度的情况,可能bmc芯片性能没那么高吧
风扇接口设置
超微的板子通常会有两个风扇分区(FAN1-5和FANA-C),这里需要注意的是:
FAN1等数字分区接口编码是0x00
FanA等字母分区编码为0x01
这里以我的主板型号为例,我将cpu散热器插在FanA(0x01),机箱散热风扇在Fan1(0x00)
注意:需要风扇是4pin即支持PWM调速的才能调速

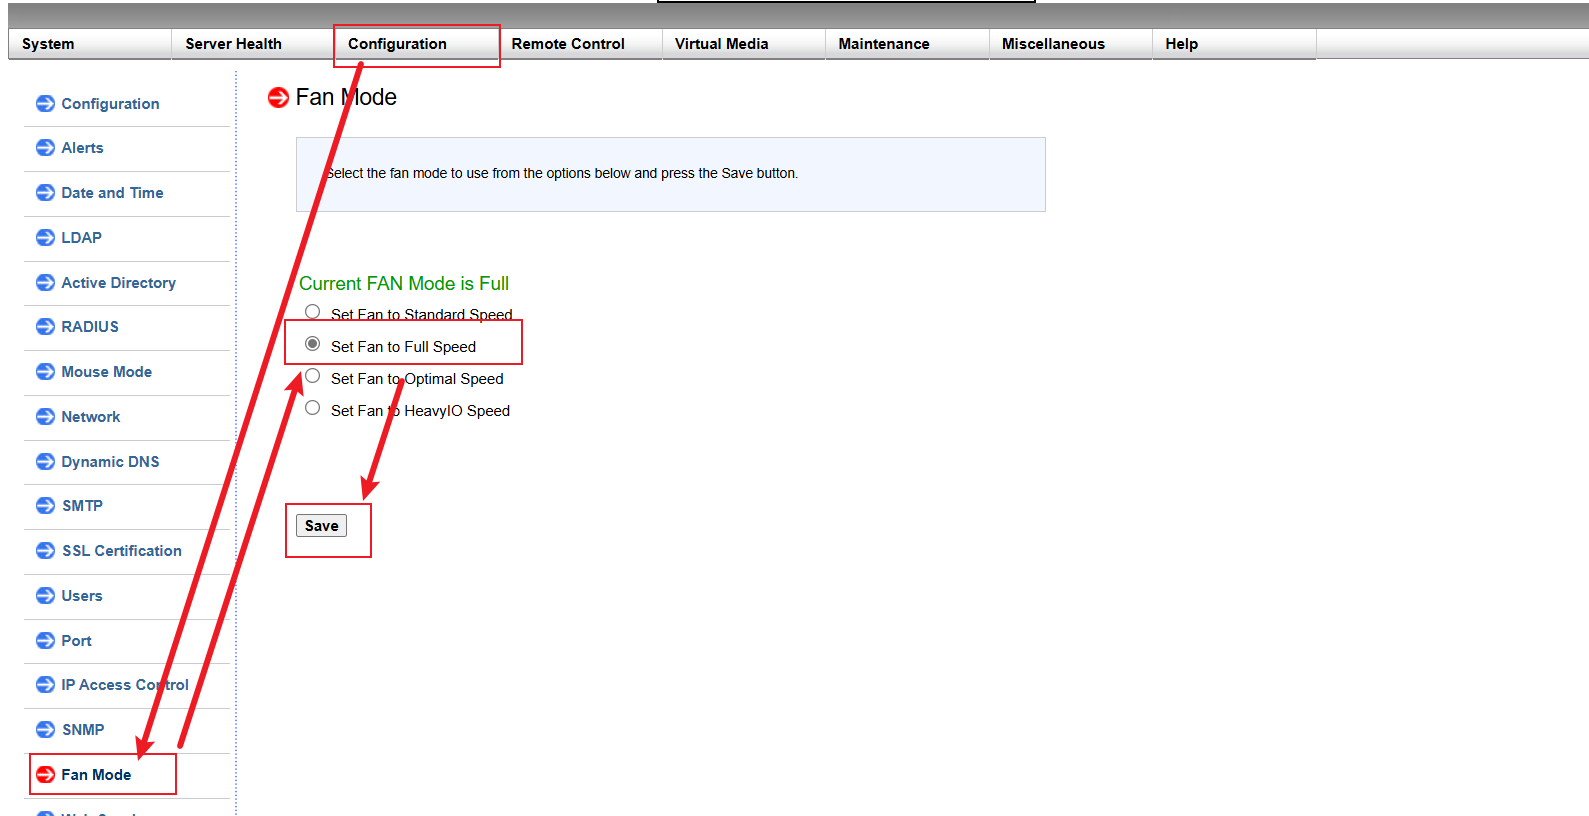
接下来在ipmi web页面将风扇模式改为Full Speed全速模式(全速模式下才能手动设置pwm占空比调整转速)
系统设置
使用ssh连到系统中,接下来用pve系统演示
1.安装Sensors
# CentOS
yum install lm_sensors
# Debian/Ubuntu
apt install lm_sensors
2.初始化Sensors
sensors-detect基本上回车使用默认值就可以
root@pve:~# sensors-detect
# sensors-detect version 3.6.0
# System: Supermicro X11SSH-F/-LN4F [Reborn by dsanke]
# Board: Supermicro X11SSH-F
# Kernel: 6.8.12-8-pve x86_64
# Processor: Intel(R) Pentium(R) Gold G5500 CPU @ 3.80GHz (6/158/11)

This program will help you determine which kernel modules you need
to load to use lm_sensors most effectively. It is generally safe
and recommended to accept the default answers to all questions,
unless you know what you're doing.

Some south bridges, CPUs or memory controllers contain embedded sensors.
Do you want to scan for them? This is totally safe. (YES/no):
Module cpuid loaded successfully.
Silicon Integrated Systems SIS5595...                       No
VIA VT82C686 Integrated Sensors...                          No
VIA VT8231 Integrated Sensors...                            No
AMD K8 thermal sensors...                                   No
AMD Family 10h thermal sensors...                           No
AMD Family 11h thermal sensors...                           No
AMD Family 12h and 14h thermal sensors...                   No
AMD Family 15h thermal sensors...                           No
AMD Family 16h thermal sensors...                           No
AMD Family 17h thermal sensors...                           No
AMD Family 15h power sensors...                             No
AMD Family 16h power sensors...                             No
Hygon Family 18h thermal sensors...                         No
Intel digital thermal sensor...                             Success!
    (driver `coretemp')
Intel AMB FB-DIMM thermal sensor...                         No
Intel 5500/5520/X58 thermal sensor...                       No
VIA C7 thermal sensor...                                    No
VIA Nano thermal sensor...                                  No

Some Super I/O chips contain embedded sensors. We have to write to
standard I/O ports to probe them. This is usually safe.
Do you want to scan for Super I/O sensors? (YES/no):
Probing for Super-I/O at 0x2e/0x2f
Trying family `National Semiconductor/ITE'...               No
Trying family `SMSC'...                                     No
Trying family `VIA/Winbond/Nuvoton/Fintek'...               No
Trying family `ITE'...                                      No
Probing for Super-I/O at 0x4e/0x4f
Trying family `National Semiconductor/ITE'...               No
Trying family `SMSC'...                                     No
Trying family `VIA/Winbond/Nuvoton/Fintek'...               No
Trying family `ITE'...                                      No

Some systems (mainly servers) implement IPMI, a set of common interfaces
through which system health data may be retrieved, amongst other things.
We first try to get the information from SMBIOS. If we don't find it
there, we have to read from arbitrary I/O ports to probe for such
interfaces. This is normally safe. Do you want to scan for IPMI
3.查看温度
方法1
一般使用sensors查看温度
sensorsroot@pve:~# sensors
power_meter-acpi-0
Adapter: ACPI interface
power1: N/A (interval = 4294967.29 s)
acpitz-acpi-0
Adapter: ACPI interface
temp1: +27.8°C
temp2: +29.8°C
coretemp-isa-0000
Adapter: ISA adapter
Package id 0: +43.0°C (high = +80.0°C, crit = +100.0°C)
Core 0: +43.0°C (high = +80.0°C, crit = +100.0°C)
Core 1: +42.0°C (high = +80.0°C, crit = +100.0°C)
pch_skylake-virtual-0
Adapter: Virtual device
temp1: +38.0°C
nvme-pci-0500
Adapter: PCI adapter
Composite: +35.9°C (low = -0.1°C, high = +71.8°C)
(crit = +89.8°C)
大致讲解一下各代表什么(不同主板可能命名编号不一样,仅供参考):
acpitz-acpi-0:主板温度
coretemp-isa-0000:cpu温度
pch_skylake-virtual-0:pch温度
方法2
方法1查看方便我们肉眼,但写脚本的时候还是喜欢更格式化的输入,那么可以使用sensors -j输出json格式
sensors -jroot@pve:~# sensors -j
{
"power_meter-acpi-0":{
"Adapter": "ACPI interface",
"power1":{
ERROR: Can't get value of subfeature power1_average: Can't read
"power1_average_interval": 4294967.295
}
},
"acpitz-acpi-0":{
"Adapter": "ACPI interface",
"temp1":{
"temp1_input": 27.800
},
"temp2":{
"temp2_input": 29.800
}
},
"coretemp-isa-0000":{
"Adapter": "ISA adapter",
"Package id 0":{
"temp1_input": 45.000,
"temp1_max": 80.000,
"temp1_crit": 100.000,
"temp1_crit_alarm": 0.000
},
"Core 0":{
"temp2_input": 45.000,
"temp2_max": 80.000,
"temp2_crit": 100.000,
"temp2_crit_alarm": 0.000
},
"Core 1":{
"temp3_input": 44.000,
"temp3_max": 80.000,
"temp3_crit": 100.000,
"temp3_crit_alarm": 0.000
}
},
"pch_skylake-virtual-0":{
"Adapter": "Virtual device",
"temp1":{
"temp1_input": 38.000
}
},
"nvme-pci-0500":{
"Adapter": "PCI adapter",
"Composite":{
"temp1_input": 35.850,
"temp1_max": 71.850,
"temp1_min": -0.150,
"temp1_crit": 89.850,
"temp1_alarm": 0.000
}
}
}
4.编写脚本
我们创建一个脚本文件,存放在/usr/local/bin/fan_control.sh,内容如下:
(代码由AI生成后我人工调试,如果遇到问题欢迎反馈或指正)
#!/bin/bash

# 设置错误处理:遇到错误时退出脚本
set -e

# 检查是否安装了jq
if ! command -v jq &> /dev/null; then
    echo "jq is not installed. Please install it first."
    exit 1
fi

# 定义温度获取函数
get_temp() {
    local sensor_name="$1"
    local temp
    local sensors_output=$(sensors -j 2>/dev/null)
    if [[ $? -ne 0 ]]; then
        echo "Error: Failed to execute 'sensors -j' command." >&2
        return 1
    fi
    case "$sensor_name" in
        "coretemp-isa-0000")
            temp=$(echo "$sensors_output" | jq -r --arg sensor_name "$sensor_name" '.[$sensor_name]["Package id 0"].temp1_input // empty')
            ;;
        "pch_skylake-virtual-0")
            temp=$(echo "$sensors_output" | jq -r --arg sensor_name "$sensor_name" '.[$sensor_name]["temp1"].temp1_input // empty')
            ;;
        *)
            temp=$(echo "$sensors_output" | jq -r --arg sensor_name "$sensor_name" '
                .[$sensor_name] | .. | objects | select(has("temp1_input") or has("temp2_input") or has("temp3_input")) |
                (.temp1_input // .temp2_input // .temp3_input) // empty
            ')
            ;;
    esac

    if [[ -z "$temp" ]]; then
        echo "Error: Temperature value not found for sensor $sensor_name" >&2
        return 1
    fi
    temp=$(echo "$temp * 100" | bc | cut -d'.' -f1)
    temp=$(echo "$temp" | tr -d '\n' | tr -d ' ')
    echo "$temp"
}

# 定义风扇速度设置函数
set_fan_speed() {
    local fan_group="$1"
    local speed="$2"
    speed_dec=$(printf "%d" "$speed")
    if (( speed_dec > 100 )); then
        speed_dec=100
        speed=$(printf "0x%02X" "$speed_dec")
    fi
    case "$fan_group" in
        "Fan1")
            local command="ipmitool raw 0x30 0x70 0x66 0x01 0x00 $speed"
            echo "Executing: $command"
            if ! $command; then
                echo "Failed to set Fan1 speed." >&2
                return 1
            fi
            ;;
        "FanA")
            local command="ipmitool raw 0x30 0x70 0x66 0x01 0x01 $speed"
            echo "Executing: $command"
            if ! $command; then
                echo "Failed to set FanA speed." >&2
                return 1
            fi
            ;;
        *)
            echo "Unknown fan group: $fan_group"
            exit 1
            ;;
    esac
}

# 检查Bash版本是否支持关联数组
if (( BASH_VERSINFO[0] < 4 )); then
    echo "This script requires Bash 4.0 or higher."
    exit 1
fi

# 定义风扇速度曲线
# 格式:温度 -> 速度
declare -A fan1_curve=(
    [3000]=0x32  # 50%
    [4000]=0x3C  # 60%
    [5000]=0x46  # 70%
    [6000]=0x4B  # 75% (最大速度)
)

declare -A fana_curve=(
    [3000]=0x32  # 50%
    [4000]=0x32  # 50%
    [5000]=0x4B  # 75%
    [6000]=0x55  # 85% (最大速度)
)

# 主循环:持续监控温度并调整风扇速度
while true; do
    # 获取CPU温度
    cpu_temp=$(get_temp "coretemp-isa-0000")
    if [[ $? -eq 0 ]]; then
        echo "CPU Temp (scaled): $cpu_temp"
    fi

    # 获取机箱温度
    chassis_temp=$(get_temp "pch_skylake-virtual-0")
    if [[ $? -eq 0 ]]; then
        echo "Chassis Temp (scaled): $chassis_temp"
    fi

    # 根据CPU温度设置FanA组风扇速度
    fana_sorted_keys=($(echo "${!fana_curve[@]}" | tr ' ' '\n' | sort -n))
    for temp in "${fana_sorted_keys[@]}"; do
        if [[ -n "$cpu_temp" && "$cpu_temp" -ge "$temp" ]]; then
            last_speed="${fana_curve[$temp]}"
        else
            break
        fi
    done
    if [[ -n "$last_speed" ]]; then
        set_fan_speed "FanA" "$last_speed"
    fi

    # 根据机箱温度设置Fan1组风扇速度
    fan1_sorted_keys=($(echo "${!fan1_curve[@]}" | tr ' ' '\n' | sort -n))
    for temp in "${fan1_sorted_keys[@]}"; do
        if [[ -n "$chassis_temp" && "$chassis_temp" -ge "$temp" ]]; then
            last_speed="${fan1_curve[$temp]}"
        else
            break
        fi
    done
    if [[ -n "$last_speed" ]]; then
        set_fan_speed "Fan1" "$last_speed"
    fi

    # 每隔一定时间(例如10秒)重新检查温度
    sleep 10
如果传感器名称不一致,可以将脚本中的关键字进行修改
随后给运行权限
chmod +X /usr/local/bin/fan_control.sh5.设置服务
我们还需要设置一个服务去调用该脚本,创建个服务文件:
vi /etc/systemd/system/fan_control.service[Unit]
Description=Fan Control Service
After=network.target
[Service]
Type=simple
ExecStart=/usr/local/bin/fan_control.sh
User=root
Group=root
StandardOutput=journal
StandardError=journal
SyslogIdentifier=fan_control
Restart=on-failure
[Install]
WantedBy=multi-user.target
保存后,设置开机启动
systemctl daemon-reload #重载服务
systemctl enable fan_control #开机自启启动
systemctl start fan_control #手动启动服务
systemctl status fan_control #查看服务状态
6.查看运行log
我的脚本log会输出到journalctl,可以使用journalctl -u fan_control -r倒叙查看,这里为了方便,使用watch进行自动刷新
watch -n 1 'journalctl -u fan_control -r'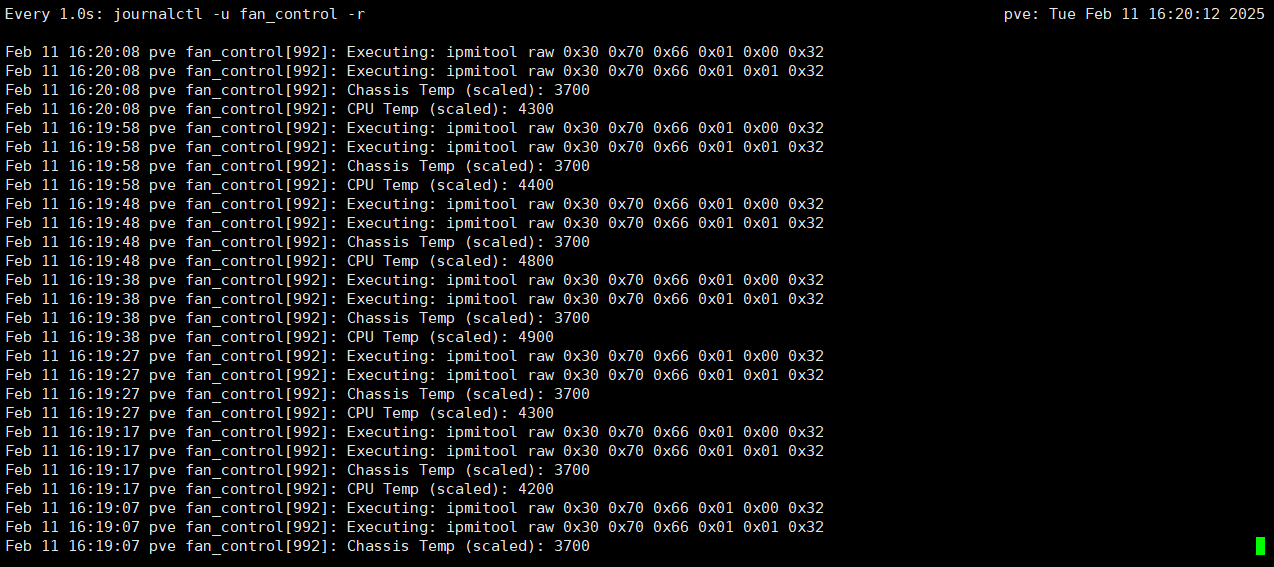
正常运行
linux
Comments 1 条评论
设置成功了,谢谢!